Site pages
Current course
Participants
General
MODULE 1.
MODULE 2.
MODULE 3.
MODULE 4.
MODULE 5.
MODULE 6.
MODULE 7.
MODULE 8.
MODULE 9.
Topic 10
Lesson 10. Simple levelling and fly levelling methods
The art of determining relative altitudes of points on the surface of the earth of beneath the surface of earth is called LEVELLING.
For execution of Engineering Projects it is very necessary to determine elevations of different points along the alignment of proposed project.
Other applications are :
i) Taking rail levels existing before track renewals to finalise final rail level profile including vertical curves.
ii) Initial ground levels for earthwork calculations.
iii) Levels for measurement of earthwork.
iv) Measurement of ballast etc.
Adjustments of level :
(i) Temporarily Adjustments – adjustments which are made for every setting of a level.
(ii) Permanent adjustments- required if some error is there in instrument.
(i) Temporary Adjustments : includes
a) setting up the level
b) levelling up
c) elimination of parallax
a) Setting up the level : This operation includes fixing the instrument on the tripod and also approximate levelling by leg adjustment.
b) Levelling up : Accurate levelling is done with the help of foot screws and by using plate levels. The object of levelling up the instrument is to make its vertical axis truly vertical.
c) Elimination of parallax : If the image formed by the objective does not lie in the plane of the cross hairs, there will be a shift in the image due to shift of the eye. Such displacement of image is termed as parallax. Parallax is removed in two stages.
1) Focusing the eye for distinct vision of cross hairs.
2) Focusing the objective so that image is formed in the plane of cross hairs.
Principles of levelling :
a) Simple levelling : The operation of levelling for determining the difference in elevation, if not too great between two points visible from single position of the level is known as simple levelling.
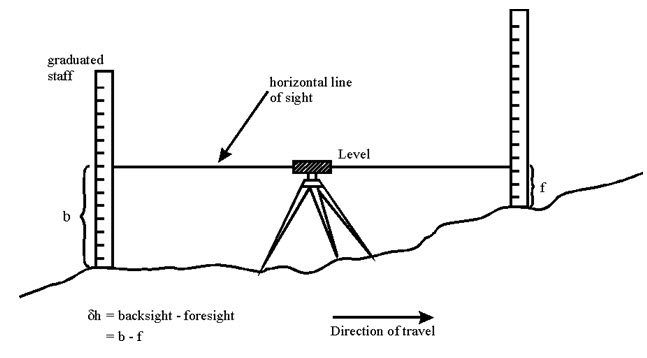
Fig 10.1 Simple levelling
Procedure to be followed
-
Level the instrument correctly.
-
Direct the telescope towards the staff held
-
Take the reading of Central, horizontal hair of the diaphram, where it appears to cut the staff ensuring that the bubble is central.
-
Send the staff to next point
-
Direct the telescope towards C and focus it again
-
Check up the bubble if central, if not bring it to the Central position by the foot screw nearest to the telescope.
-
Take the reading of Central Horizontal cross hair.
b)Differential levelling or fly levelling :
Any number of change points are established as required during levelling. This method is known as fly levelling.
It is adopted to find the difference in level between two points, when
(i) The two points are too far away
(ii) the difference in level between two points is large
(iii) there are no obstructions in between the two points concerned.
This method is used in order to find the difference in elevation between two points.
i) If they are too far apart
ii) if the difference in elevation between them is too great.
iii) If there are obstacles intervening. In such case it is necessary to set up the level in several positions and to work in series of stages.
The difference of level of the points A&B is equal to the algebraic sum of these difference between the sum of back sights and sum of the fore sights i.e. Σ BS - Σ FS.

The elevation of change point = Elevation of P + Back sight at P – Fore
sight at change point (C.P)
= 100.00+1.60-1.10 = 100.50 m
The second height of the instrument = The elevation of change point+
Back Sight at change point
= 100.50+1.25 = 101.75 m
The elevation of Q = The second height of instrument –
foresight at Q
= 101.75 – 1.81 = 99.94 m
RISE AND FALL METHOD
-
The staff readings of the points observed from the same setting of the instrument are compared.
-
It is found whether a point is above or below the preceding point.
-
If the point is above, the staff reading will be less than the preceding point. The difference between the staff readings is called rise.
-
If the point is below the preceding point, the staff reading will be greater than that at the preceding point. The difference between the staff readings is termed fall.
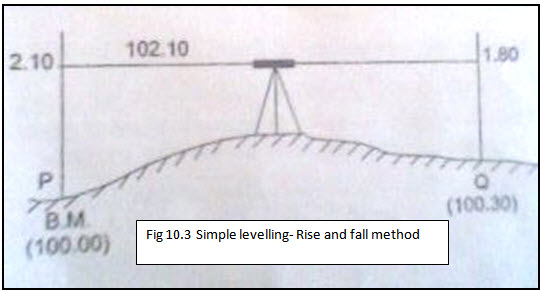
The difference between the staff readings at P and Q = 2.10 – 1.80 = 0.30 (rise)
Hence, level of Q = Elevation of P + Rise = 100.00+0.30 = 100.30 m
|
Back sight |
Intermediate station |
Fore sight |
Rise |
Fall |
Reduced Level |
Remarks |
|
1.245 |
100.00 |
BM |
||||
|
2.100 |
0.855 |
99.145 |
||||
|
2.425 |
0.810 |
1.290 |
100.435 |
STATION A |
||
|
0.480 |
1.945 |
102.380 |
STATION B |
|||
|
∑BS 3.670 |
∑FS 1.290 |
∑RISE 3.235 |
∑FALL 0.855 |
Arithmetical Check of Rise and Fall method
∑ B.S - ∑F.S = ∑Rise - ∑ Fall = Last R.L – First R.L.
3.670 – 1.290 = 3.235 – 0.855 = 102.380 – 100.00
2.380 = 2.380 = 2.380
Height of collimation or Height of instrument method
In this method, the height of the instrument is established for each setting of the instrument and the reduced level of the new point is arrived by detecting the fore sight reading of that point.
Last modified: Wednesday, 30 October 2013, 11:31 AM