Site pages
Current course
Participants
General
Module 1. Micro-irrigation
Module 2. Drip Irrigation System Design and Instal...
Module 3. Sprinkler Irrigation
Module 4. Fertigation System
Module 5. Quality Assurance & Economic Analysis
Module 6. Automation of Micro Irrigation System
Module 7. Greenhouse/Polyhouse Technology
Lesson 31. Facilities and Instruments Required in Greenhouse
31.1 Lamps, exhaust fans, CO2 cylinders, Micro irrigation system, fertigation equipment,
31.1.1 Lamps
Plants respond to the relative lengths to light and dark periods as well as to the intensity and quality of light. Artificial light has been used extensively to control plant growth processes under various conditions. Plants differ in the need for light; some thrive on sunshine, others grow best in the shade. Most plants will grow in either natural or artificial light. Artificial light can be used in the following ways:
To provide high intensity light when increased plant growth is desired.
To extend the hours of natural daylight or to provide a night interruption to maintain the plants on long-day conditions.
Keep growing throughout the year with outdoor fixtures and greenhouse lights that offer outstanding uniformity and superior light levels. Growers Supply has energy-efficient lighting fixtures, replacement light bulbs, high pressure sodium fixtures and outdoor lighting for your nursery or greenhouse. We offer LED bulbs, energy-saving fluorescent lights, tube lamps, metal halide lamps, heat lamps, high bay fixtures, low bay fixtures and more. Switch to light bulbs that give you the power to save money and energy in your greenhouse, cold frame, high tunnel or home.
Proper lighting not only extends the gardening day by enabling the gardener to work in the greenhouse during the dark evenings of winter and early spring, but it aids plant growth. Three basic types of lamps used in greenhouse lighting are:
Fluorescent lamps - Fluorescent bulbs are the most commonly used light source for the home gardener. Fluorescent bulbs produce a linear light that gives off more efficient and uniform lighting than incandescent types. Fluorescent bulbs are available in 28–225 watt configurations and can be stacked in banks to enhance coverage areas. In late winter/early spring, most gardeners who start plants from seed utilize some type of inexpensive fluorescent shop light system as their light source. These have the advantage of higher light efficiency with low heat. This type of lamp is the most widely used for supplemental light. It is available in a variety of colors but cool-white lamps are the most common. High intensity (1500 ma) fluorescent tubes that require higher wattage are also commonly used to reach 2000 foot candles. - These have the advantage of higher light efficiency with low heat. This type of lamp is the most widely used for supplemental light. It is available in a variety of colors but cool-white lamps are the most common. High intensity (1500 ma) fluorescent tubes that require higher wattage are also commonly used to reach 2000 foot candles. The 28–40 watt bulbs work great for germinating seeds and growing seedlings, which do not require the more expensive, higher intensity, full spectrum “grow lights.” The key in the use of these low-output lights is that you must orient them to within an inch of the top of the plants to capture all the light intensity (lumens) they have to offer. If they are not placed close to the plants, inter-nodal elongation will occur, producing weak, spindly plants that will generally not perform well. While houseplants, seedlings and low-light flowering plants can flourish under fluorescent lights, they fall far short of the light requirements needed to produce most mature flowering and fruiting plants. White reflectors or reflectors made from aluminum foil may aid in maximizing what little light is available from these low-intensity bulbs.
Fluorescent lighting is rarely used in commercial greenhouses for producing mature flowering or fruiting plants because of their low-intensity output and the sunlight-shading effects that their fixtures and reflectors create. Their primary use in commercial operations is in providing light for germination benches. Under these conditions the lamps are hung very close to the seedlings. Because seedlings require much lower light levels than mature plants, several fluorescent lamps alone are capable of meeting their light requirements. As the seedlings enter their vegetative growth stage, their light requirements rapidly outpace the fluorescent lamps’ capability of providing enough light intensity and quality to meet their demands. To sustain this rapid growth past the seedling stage, plants need to be moved into a greenhouse where direct sunlight or high-output artificial lighting is available.
Incandescent lamps - The incandescent “light bulb” type of light source may be useful in controlling day length, but it offers little help as a grow light. Since the major portion of energy going into incandescent bulbs is released as heat rather than as light, conventional light bulbs are primarily used to manipulate photoperiod rather than as supplemental lighting to enhance growth. These vary in size from 60 watts to 500 watts. They are used to extend day- length in greenhouses. The grower can vary foot- candle levels by adjusting the spacing and mounting height above the plants.
High-intensity discharge (HID) lamps - High-intensity discharge bulbs are the most costly to purchase and operate but offer the highest quality light output of all grow-light bulbs. Where plant appearance is critical and natural sunlight limited, metal halide bulbs should be used. Due to their energy efficiency and the general quality of the light spectrum emitted (yellowish light), high-pressure sodium (HP sodium) lights are the most commonly used types found in commercial greenhouses. These have a long life (5000 hours or more). With improvements made possible by the addition of sodium and metal-halides, the lamp has a high emission of light in the regions utilized by plants. These have a long life (5000 hours or more). With improvements made possible by the addition of sodium and metal-halides, the lamp has a high emission of light in the regions utilized by plants. Depending on the crop needs, natural light availability and greenhouse design, there are several wattages of HID lamps available. These range from 150–1000 watts. While the crop light requirements are normally documented and the natural lighting duration measurable, how the greenhouse design impacts the choice of lamp wattage is not readily apparent. An efficient greenhouse operation will maximize its lighting by assuring a uniform level of light across all of its growing benches. If there are sections that receive less light, the plants in these areas will become etiolated (“leggy”) and the crop will not develop the uniform height that the market desires. In a greenhouse with a low roof it may be challenging to achieve uniform light with 1000-watt fixtures since the distance that they can be moved above the crop is limited. Although it is more costly to purchase several smaller lights than one large one, multiple lights allow additional flexibility in achieving uniform light dispersal.
Quartz-Halogen (Spotlights)-The quartz-halogen “spotlight” type bulbs produce a whiter light and are more electricity-efficient than the incandescent bulb, but because they, too, deliver a point-source type of illumination they are far less efficient than other available bulbs.
31.1.2 Exhaust fans
Greenhouse ventilation involves removing air from inside the greenhouse and replacing it with outside air. The ventilation may be (1) natural-caused by wind and temperature forces and (2) mechanical--accomplished by using fans. The purposes of ventilation are to control high temperatures during the summer caused by the influx of solar radiation, to maintain relative humidity at acceptable levels during winter, to provide uniform air flow throughout the entire greenhouse, and to maintain acceptable levels of gas concentration in the greenhouse. Ventilation systems for greenhouses must be considered for three climatic conditions that occur during the year--winter, summer, and spring-fall. Winter Ventilation
A heating system with adequate capacity is needed in the winter to maintain environmental conditions inside the greenhouse conducive for plant growth and development. Even during the coldest part of the winter, when the heating system is running at full capacity, some ventilation is still required in the greenhouse. Fresh, outside air must be ventilated into the greenhouse to remove the warm, moisture-laden air from within the greenhouse. If moist air within the greenhouse is not removed, high humidity and excessive condensation will occur. Studies have shown that humidity over 90% foster rapid development of leaf mold and fruit and stem rot. Problems with infection of tomatoes with leaf mold start occurring when humidity exceed 80%, but below 70%, problems with infection are slight. Economic problems associated with condensation in greenhouses are fungus diseases, difficulty in maintaining a clean greenhouse, more rapid deterioration of structural components, and damp, uncomfortable environmental conditions for the workers. Exhausting moist air and replacing it with heated outside air is effective in eliminating condensation and other problems resulting from high humidity. Whenever ventilation rates are increased in the winter, the heating requirements also increase. Consequently, it is necessary to determine a ventilation rate that will maintain humidity below the damaging level and, at the same time, keep the heating requirements as low as possible. Ventilation requirements of greenhouses in winter are generally on the order of two to three air exchanges per hour. The higher the inside temperature in the greenhouse, the lower the air exchange rate is required to maintain humidity below the damaging level. However, in no circumstances should a ventilation rate of less than two air changes per hour be used. Besides controlling humidity, this minimum ventilation rate is required to remove any gases of combustion that may be present as a result of leakages around the heater and ducting when a direct-fired heating system is used.
Summer Ventilation
The main purpose of a ventilation system in a greenhouse during the summer is to prevent the air temperature inside the greenhouse from rising too high above the outside air temperature. The reason for the higher air temperature inside the greenhouse is because of the large influx of solar radiation through the greenhouse glazing material. The ventilation system must effectively move air directly through the crop and over the soil to prevent excessive temperature buildups around the plants. A generally accepted minimum ventilation rate for temperature control in the summer is one air change per minute. The ventilation rates range from one air change every three minutes to three air changes per minute. As ventilation rates increase, the temperature difference between inside and outside air decreases. But the disadvantage of increased ventilation rate is the increased cost for fans and accessories, as well as increased operating costs. Regardless of how high the ventilation rate in a greenhouse is in the summer, the inside air temperature during the day will never be as low as the outside air temperature. If one is interested in maintaining an inside air temperature below outside air temperature, then evaporative cooling or some other means of conditioning the air must be used.
Spring-Fall Ventilation
The recommended ventilation rates for the spring-fall seasonal periods will be somewhere between rates required for summer temperature control and those required for winter-humidity control. The spring-fall periods are characterized by some times that is relatively cool and cloudy and other times that are warm and sunny. No special provisions are necessary for maintaining ventilation rates during this period except for the temperature and humidity controls that will determine the amount of ventilation necessary.
31.1.3 Carbon di-oxide
The benefits of carbon dioxide supplementation on plant growth and production within the greenhouse environment have been well understood for many years. Carbon dioxide can be obtained by burning carbon-based fuels such as natural gas, propane, and kerosene, or directly from tanks of pure CO2. Carbon dioxide (CO2) is an essential component of photosynthesis (also called carbon assimilation). Photosynthesis is a chemical process that uses light energy to convert CO2 and water into sugars in green plants. These sugars are then used for growth within the plant, through respiration. The difference between the rate of photosynthesis and the rate of respiration is the basis for dry-matter accumulation (growth) in the plant. In greenhouse production the aim of all growers is to increase dry-matter content and economically optimize crop yield. CO2 increases productivity through improved plant growth and vigour. Some ways in which productivity is increased by CO2 include earlier flowering, higher fruit yields, reduced bud abortion in roses, improved stem strength and flower size. Growers should regard CO2 as a nutrient.
For the majority of greenhouse crops, net photosynthesis increases as CO2 levels increase from 340–1,000 ppm (parts per million). Most crops show that for any given level of photo synthetically active radiation (PAR), increasing the CO2 level to 1,000 ppm will increase the photosynthesis by about 50% over ambient CO2 levels. For some crops the economics may not warrant supplementing to 1,000 ppm CO2 at low light levels. For others such as tulips, and Easter lilies, no response has been observed.
Carbon dioxide enters into the plant through the stomata openings by the process of diffusion. Stomata are specialized cells located mainly on the underside of the leaves in the epidermal layer. The cells open and close allowing gas exchange to occur. The concentration of CO2 outside the leaf strongly influences the rate of CO2 uptake by the plant. The higher the CO2 concentration outside the leaf, the greater the uptake of CO2 by the plant. Light levels, leaf and ambient air temperatures, relative humidity, water stress and the CO2 and oxygen (O2) concentration in the air and the leaf, are many of the key factors that determine the opening and closing of the stomata.
Ambient CO2 level in outside air is about 340 ppm by volume. All plants grow well at this level but as CO2 levels are raised by 1,000 ppm photosynthesis increases proportionately resulting in more sugars and carbohydrates available for plant growth. Any actively growing crop in a tightly clad greenhouse with little or no ventilation can readily reduce the CO2 level during the day to as low as 200 ppm. The decrease in photosynthesis when CO2 level drops from 340 ppm to 200 ppm is similar to the increase when the CO2 levels are raised from 340 to about 1,300 ppm. During particular times of the year in new greenhouses, and especially in double-glazed structures that have reduced air exchange rates, the carbon dioxide levels can easily drop below 340 ppm which has a significant negative effect on the crop. Ventilation during the day can raise the CO2 levels closer to ambient but never back to ambient levels of 340 ppm. Supplementation of CO2 is seen as the only method to overcome this deficiency and increasing the level above 340 ppm is beneficial for most crops. The level to which the CO2 concentration should be raised depends on the crop, light intensity, temperature, ventilation, stage of the crop growth and the economics of the crop. For most crops the saturation point will be reached at about 1,000–1,300 ppm under ideal circumstances. A lower level (800–1,000 ppm) is recommended for raising seedlings (tomatoes, cucumbers and peppers) as well as for lettuce production. Even lower levels (500–800 ppm) are recommended for African violets and some Gerbera varieties. Increased CO2 levels will shorten the growing period (5%–10%), improve crop quality and yield, as well as, increase leaf size and leaf thickness. The increase in yield of tomato, cucumber and pepper crops is a result of increased numbers and faster flowering per plant.
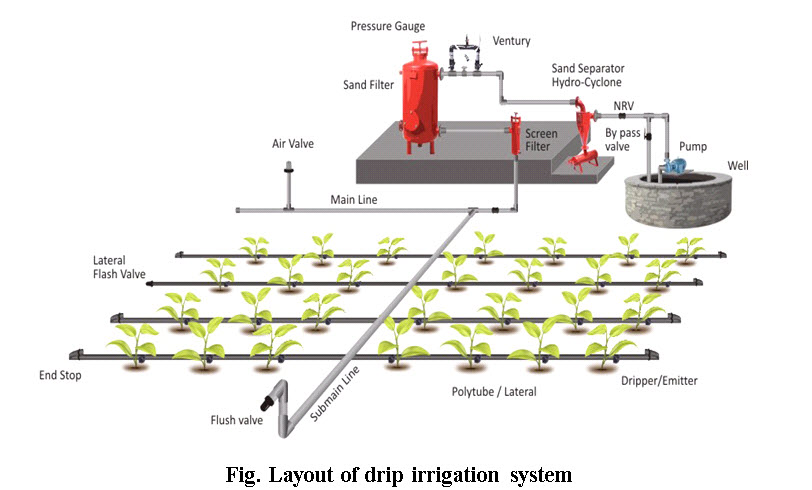
31.1.4 Micro irrigation system
Drip irrigation, also known as trickle irrigation or micro irrigation or localized irrigation, is an irrigation method that saves water and fertilizer by allowing water to drip slowly to the roots of plants, either onto the soil surface or directly onto the root zone, through a network of valves, pipes, tubing, and emitters. It is done through narrow tubes that deliver water directly to the base of the plant. It delivers required and measured quantity of water in relatively small amounts slowly to the individual or groups of plants. Water is applied as continuous drops, tiny streams, or fine spray through emitters placed along a low-pressure delivery system. Such system provides water precisely to plant root zones and maintains ideal moisture conditions for plant growths.
(Source: http://www.tulsigroup.com/Drip.html)
Components of Drip Irrigation System:
1. Control Head: This includes pump or over head tank, fertilizers or chemical application device and filters.
a) Water Source: Well, reservoir or streams
b) Pump: A centrifugal or other suitable pump to achieve required head in the pipe line.
c) By-Pass Line: A line is provided so that pumped water can be used for other activities when irrigation is not going on.
d) Fertilizer Applicator: To add fertilizer to the water directly in the pipeline.
e) Pressure Gauge: To measure head in the pipe line.
f) Sand Filter: To remove coarse impurity of water coming from water source or clogs from fertilizer.
g) Gate Valve: To regulate the flow of water in the main pipe line.
h) Screen Filter: A line filter is placed at the end of control head to avoid clogging in drippers.
2. Distribution Network: This part is responsible for distributing the water to the crop received by control head.
a) Main Line: It is made of HDPE or PVC having diameter in the range of 50-75mm and is able to withstand a pressure head of atleast 4-6kg/cm2.
b) Sub main: It is made of HDPE/PVD having diameter in the range of 37-63mm and can withstand 2-5 kg/ cm2 pressure.
c) Ball Valve: To engage or disengage a specific sub-main.
d) Flush Valve: These are provided at the end of sub mains and are used to flush the extra water if required.
e) Laterals: These are made of LDPE/ LLDPE and having diameter in the range of 12-16mm. It has an ability to withstand 2 kg/ cm2 pressure.
f) Drippers: These are small emission devices having small flow rates and are made of poly propylene. These are provided at individual plant and have specific distance between each dripper.
31.1.5 Fertigation
Fertigation is method of applying fertilizers, soil amendments and other water soluble products required by the plants during its growth stages through drip/sprinkler irrigation system. Crops are grown intensively in the greenhouse. Hence the nutrient status maintained in the root environment is usually higher than the open field because of the greater up-take by greenhouse crops. As the mineral uptake is proportional to the total yield, the high physical production level involves high fertilizer inputs. In this respect the amount and combination of the fertilizers is critical for both, yield production and crop protection. Soluble fertilizers or liquid fertilizers are used in fertigation, they should not precipitate as insoluble salts by reacting with other fertilizers or ions present in the irrigation water. Apart from the high crop demand, the high fertilizer inputs are also believed to be necessary to maintain high osmotic pressure level in the root environment, in order to prevent lush growth and to enhance product quality. The fertigation allows us to apply the nutrients exactly and uniformly only to the wetted root volume, where the active roots are concentrated. This remarkably increases the efficiency in the application of the fertilizer, which allows reducing the amount of applied fertilizer. This not only reduces the production costs but also lessens the potential of groundwater pollution caused by the fertilizer leaching. Fertigation allows to adapt the amount and concentration of the applied nutrients in order to meet the actual nutritional requirement of the crop throughout the growing season. In order to make a correct planning of the nutrients supply to the crop according to its physiological stage, we must know the optimal daily nutrient consumption rate during the growing cycle that results in maximum yield and production quality. These functions are specific for each crop and climate, and were determined in different experiments for the main crops.
Other advantages of the fertigation are: (1) the saving of energy and labor, (2) the flexibility of the moment of the application (nutrients can be applied to the soil when crop or soil conditions would otherwise prohibit entry into the field with conventional equipment), (3) convenient use of compound and ready-mix nutrient solutions containing also small concentrations of micronutrients which are otherwise very difficult to apply accurately to the soil, and (4) the supply of nutrients can be more carefully regulated and monitored. When fertigation is applied through the drip irrigation system, crop foliage can be kept dry thus avoiding leaf burn and delaying the development of plant pathogens.
Equipments used for fertigation
1) Venturi injector:
This is very simple and low cost device. A partial vacuum is created in the system which allows suction of the fertilizers in to the irrigation system.

Image Source: http://www.ncpahindia.com/articles/article17.pdf
The vacuum is created by diverting a percentage of water flow from the main and passes it through a constriction which increases the velocity of flow thus creating a drop in the pressure. When the pressure drops the fertilizer solution is sucked in to the venturi through a suction pipe from the tank and from there enters in to irrigation stream. The suction rate of the venturi is 30 to 120 l/hr.
1) Fertilizer tank:
In this system part of the irrigation water diverted from the main of the flow through a tank containing fertilizer in fluid or soluble solid form, before returning to the main line, the pressure in the tank and main line is the same but a slight drop in the pressure is created between the off take and return pipes from the tank by means of a pressure reducing valve. This causes water from main line to flow through the tank causing dilution and flow of the diluted fertilizer in to the irrigation stream. With this system the concentration of the fertilizer entering the irrigation water charges continuously with the time, starting at high concentration. As a result uniformity of the fertilizer distribution can be a problem. Fertilizer tanks are available in 90, 120, 160 liters capacity.
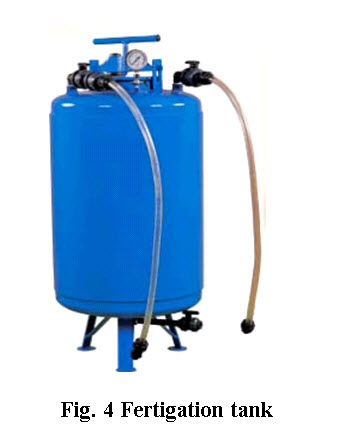
Image Source: http://www.ncpahindia.com/articles/article17.pdf
2) Fertilizer injector pump:
These are piston or diaphragm pumps which are driven by the water pressure of the irrigation system and such as the injection rate is proportional to the flow of water in the system. A high degree of control over the fertilizer injection rate is possible, no serious head losses are incurred and operating costs are low. Another advantage is that, if the flow of water stops, fertilizer injection also automatically stops. This is perfect equipment for accurate fertigation. Suction rates of pumps vary from 40 lit to 160 lit/hr.
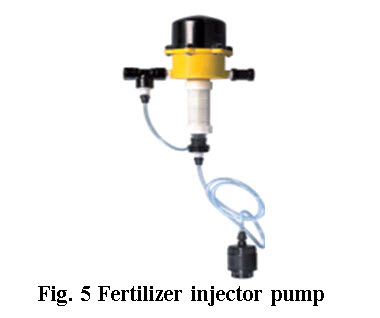
Image Source: http://www.ncpahindia.com/articles/article17.pdf
31.2 Instruments for Greenhouse Heating
Having a greenhouse is a must when you want to grow plants that are frost tender or you want to start early seedlings. Maintaining a correct temperature in your greenhouse for the plants that you have chosen to grow is an important thing. There are some options from which you can choose in order to heat your greenhouse: electric heaters, gas heaters, paraffin heaters, solid fuel hot water systems. If the heater does not have a thermostat is better to use a min/max thermometer and a frost alarm. Always choose a heater which is powerful enough to maintain the required temperature efficiently and is also convenient as cost of installation and running costs.
Electric heaters - are most reliable, efficient and convenient to use in your greenhouse. Most of them are thermostatically controlled, so there will be no waist of energy. They don't need regular refueling or special maintenance, do not produce fumes or water vapors. There are some types of electric heaters that can be used to heat your greenhouse: fan heaters, water-proof tubular heaters or convector heaters. Fan heaters are the most effective because they can be moved, promote good air circulation and also can be used in warm weather to cool the greenhouse. Tubular heaters need to be fitted to the sides of the greenhouse, just above floor level.
Gas heaters - connected to the mains supplies or from bottled gas. Their thermostats are not so efficient as to the electric heaters and if used with bottled gas they need to be regularly replaced. Propane gas releases fumes and water vapors as it burns, so proper ventilation is required in this case. Always have two bottles connected by an automatic switch-over valve in case one bottle runs out. Keep the gas cylinders in a safe place and have them checked regularly.
Paraffin heaters: These types of heaters are not as efficient as electric or gas heaters in their use of fuel because they are not thermostatically controlled. They may be expensive to run because some of energy is wasted if you need to maintain a high temperature in your greenhouse but they are inexpensive to buy and no installation cost is required. Proper ventilation is necessary in this case also because it produce plant-toxic fumes and water vapors. Another disadvantage is that you need to transport and store the fuel and check its level every day to make sure that it is burning cleanly.
Solid fuel hot water systems: it is being rarely used now. Oil- and gas-fired circulated hot water systems are still sometimes used but only on a small scale. They need regular stoking and cleaning out of the fire.
Thermometers and frost alarms: it is must if your heater is not thermostatically controlled. Use a min/max thermometer to check that the right temperatures are maintained overnight. In regions with extremely low temperatures you should use a frost alarm also. It will allow you time to protect plants if temperatures drop unexpectedly because of a power failure or heater breakdown. An alarm bell will sound remotely to announce you that temperature has drop to near freezing.
31.3 Instruments for Greenhouse Cooling
Overheating of the greenhouse during the summer months is a common but unnecessary problem. Your greenhouse can and should be a comfortable and refreshing place for you and your plants to enjoy on those hot summer days. Keeping the greenhouse cool is accomplished by obtaining a proper balance of shading, ventilation and humidity. Following are some guidelines.
Traditional ventilation systems of ridge or end vents work well if large enough and oriented to take advantage of prevailing winds. The upper vents should be equal in size to 20% of the floor area. In addition, there should be vents in the lower walls equal to 10% of the greenhouse floor area. A typical 8' x 12' greenhouse would have 15 sq feet of roof vents and 10 sq feet of lower vents. The roof vent should open 45° above horizontal. These vents can be operated by hand, or by non-electric solar powered pistons. Thermostatically controlled exhaust fan systems are a popular alternative to traditional roof vents. The fan uses very little electricity, and the thermostat makes the system automatic and easily adjustable to various operating temperatures. The thermostat is usually set at 75° to 80° F. The proper size fan will change the air in the greenhouse in about 1½ to 2 minutes. Determine the volume of your greenhouse (Length x Width x Average Height) and multiply by 0.75 to obtain the ventilation rate in Cubic Feet per Minute (CFM). (For Average Height, measure halfway up a roof rafter and then measure straight down to the floor. This vertical measurement is the Average Height). To enable the exhaust fan to operate effectively, fresh air intake shutters must be provided in the opposite end of the greenhouse. The shutters are opened by the flow of air drawn into a greenhouse by the fan, or they can be opened and closed by a shutter motor. Determine shutter size by dividing the fan CFM by 250. This gives you shutter size in square feet. If more than one shutter is to be used, divide this figure by the number of shutters to obtain the area of each shutter. (Two shutters are recommended for greenhouses over 100 sq. ft. or wider than 8 feet).
In a greenhouse good ventilation is essential, even over the winter, to avoid a built-up of stuffy or damp, stale air and to control temperature levels. The area covered by ventilations should be equal to at least one sixth of the floor area. There are few types of ventilation methods that you could use in your greenhouse, depending on the type of greenhouse that you have.
Few models of greenhouse are supplied with enough ventilation as standard, so you might need to order some additional air vents, hinged and louver windows or extractor fans when buying a new greenhouse.
Wind ventilation system: The position of ventilators is important in the air exchange in the greenhouse. If ventilators are placed on the sides and roof of the greenhouse and are also staggered, this will ensure that air circulates throughout the entire area of the greenhouse. If vents are placed directly opposite one another, air will simply blow straight through the greenhouse. To increase ventilation over the summer you may also keep the doors open.
Chimney ventilation system: This system depends on warm, humid air rising out of roof vents and being replaced by fresh air that is drawn in as a result through lower ventilations, which are usually positioned along the sides of the greenhouse either above or below the staging.
Fan ventilation system: This is a mechanically driven system that works by extracting air from the greenhouse at head height or slightly higher and drawing in fresh air through vents lower down and usually at the opposite end of the greenhouse.
Hinged ventilators: This system will allow maximum airflow while at the same time will prevent direct gusts of wind from entering the greenhouse. These may be fitted to the sides or roof of the greenhouse and should open wide to an angle of about 45 degrees.
Automatic vent openers: This system simplifies the temperature control in the greenhouse as they open automatically. They should be fitted to at least some of the hinged or louvre ventilators. There are many models of auto vent openers available.
Extractor fans: Primarily designed to be used in the kitchen, this system is also ideally suited for use in the greenhouse. Choose a fan that is powerful enough for the particular size of your greenhouse. A louvre window positioned at the opposite end of the greenhouse to the extractor fan and set lower down is essential to provide a flow of fresh air to replace the stale air that is drawn out by the fan.
Greenhouse Misting
Shading and ventilation will prevent the greenhouse from seriously overheating, but it is evaporation of moisture inside the greenhouse that will actually cool the greenhouse. Evaporating water soaks up heat like a sponge because heat is used when water changes from a liquid to a gas. Good air circulation from fans increases evaporation. The amount of moisture necessary to cool the greenhouse will vary considerably depending on the amount of ventilation and shading provided, the local climate, and daily weather changes. Generally, 1 to 2 gallons per hour for each 10 square feet of floor area will provide enough moisture. A good misting system will disperse the water evenly around the greenhouse in a fine mist without soaking the plants. There are several ways to provide moisture in the greenhouse. Most common is to soak the floor with a sprinkler hose. Water can be stored for slow release in 3" - 4" of pea gravel on the greenhouse floor. More accurate and reliable is an automatic system of misting nozzles. A humidistat set at 60% to 70% relative humidity will keep most plants comfortable and provide plenty of moisture for evaporation through the mist nozzles. The location of the nozzles can vary. They can be mounted under the benches, especially in front of the fresh air intake vents.
Apply mist only during daylight hours to avoid excessive humidity at night, which encourages disease. Remember, when the greenhouse cools at night, the relative humidity will rise even with the misting system off. Use a 24-hour timer to shut off the misting system 2 hours before sundown.
Greenhouse Shading
Shading the greenhouse will help to control the temperature levels if the ventilation system is insufficient. It also helps to protect vulnerable plants from too much direct sunlight. This will reduce the risk of leaf scorch and will prevent flower colors from fading in strong sunlight. Shadings applied primarily to control the temperature levels should be placed on the outside of the greenhouse as internal shadings are unlikely to reduce the temperatures significantly. Install shading to shield the greenhouse or sunroom from excess sun between 9 a.m. and 5 p.m. Shading should cover the roof and at least the upper half of the south wall. The amount of shading needed (expressed as a percentage of light blocked) will vary depending on your local climate, greenhouse design, and light requirements of your particular plants. Use the least amount of shading necessary, because excessive shading can slow plant growth of cause plants to "reach" for more light.
The amount of shade that is required in a greenhouse is not always the same; it depends on the season and the plants that are grown in the greenhouse. In the months of strongest sunlight, shading that reduces the light by 40-50 per cent is suitable for a typical mixed greenhouse. There are some types of shadings that you can use for your greenhouse: shading washes, blinds, meshes and fabrics or rigid sheets. In the next lines there will be a short description for each of them and how to use them efficiently.
Shading washes
This type of shading is often considered to be the most effective and cheapest method of reducing heat from the sun while still allowing enough light to penetrate for good plant growth. Paint or spray the wash onto the outside of the glass at the beginning of the sunny season and remove it in late summer by rubbing or washing it off using a cleaning solution.
Shading washes are inexpensive but they may be messy to apply and to remove. Also their appearance is sometimes unattractive in a small garden where the greenhouse represents the major feature. Some washes become more transparent when wet, so that on rainy days or when the weather is dull they allow more light penetration.
Blinds
Blinds are mainly used on the outside of the greenhouse and they control temperature effectively but they should be hard wearing since they will be in place for long periods. Blinds are more versatile than shading washes since they may be rolled up or down depending on the intensity of light regained. They may be used where only a section of the greenhouse needs to be shaded. Manually operated blinds need constant attention, while automatic blinds, which come into operation as soon as the temperature rises to a predetermined level, are more convenient to use, but they are expensive.
Meshes and fabrics
Flexible mesh shading materials are suitable for either interior or exterior use. They are less adaptable than blinds because they are generally fixed in position for the entire season and are less satisfactory than shading washes in helping to control plant growth. Woven and knitted fabrics are also suitable for both interior and exterior greenhouse use, but the amount of light reduction varies considerably depending on the type of fabric fitted. The quality of light allowed through to the plants is usually perfectly adequate for good growth, but the temperature in not significantly reduced.
Rigid sheets
Rigid polycarbonate sheets are sometimes used for shading in greenhouse. The sheet may be fixed either inside or outside depending by the greenhouse manufacturer recommendations. They cut down the light effectively but unless they are white in color the quality of light transmitted to the plants may not be mf patent for good growth.
Evaporative Coolers
An evaporative cooler is a device that cools air through the evaporation of water. Evaporative cooling differs from typical air conditioning systems which use vapor-compression or absorption refrigeration cycles. Evaporative cooling works by employing water's large enthalpy of vaporization. The temperature of dry air can be dropped significantly through the phase transition of liquid water to water vapor (evaporation), which can cool air using much less energy than refrigeration. In extremely dry climates, evaporative cooling of air has the added benefit of conditioning the air with more moisture for the comfort of building occupants. Unlike closed-cycle refrigeration, evaporative cooling requires a water source, and must continually consume water to operate. Evaporative cooling is a physical phenomenon in which evaporation of a liquid, typically into surrounding air, cools an object or a liquid in contact with it. Latent heat, the amount of heat that is needed to evaporate the liquid, is drawn from the air. When considering water evaporating into air, the wet-bulb temperature which takes both temperature and humidity into account, as compared to the actual air temperature (dry-bulb temperature), is a measure of the potential for evaporative cooling. The greater the difference between the two temperatures, the greater the evaporative cooling effect. When the temperatures are the same, no net evaporation of water in air occurs, thus there is no cooling effect. The wet-bulb temperature is essentially the lowest temperature which can be attained by evaporative cooling at a given temperature and humidity. A supplement to the misting system is an evaporative cooler. It works well in dry climates where the humidity is below 50%. Air is cooled 10° to 20° F by water evaporation as it is drawn through the cooler and into the greenhouse.
Advantages
Less expensive to install
Estimated cost for installation is about half that of central refrigerated air conditioning.
Less expensive to operate
Estimated cost of operation is 1/4 that of refrigerated air.
Power consumption is limited to the fan and water pump. Because the water vapor is not recycled, there is no compressor that consumes most of the power in closed-cycle refrigeration.
The refrigerant is water. No special refrigerants, such as ammonia, sulfur dioxide or CFCs, are used that could be toxic, expensive to replace, contribute to ozone depletion and/or be subject to stringent licensing and environmental regulations.
Ease of maintenance
The only two mechanical parts in most basic evaporative coolers are the fan motor and the water pump, both of which can be repaired at low cost and often by a mechanically inclined homeowner.
Ventilation air
Evaporative cooling increases humidity. In dry climates, this may improve comfort and decrease static electricity problems.
Disadvantages
Performance
High dew point (humidity) conditions decrease the cooling capability of the evaporative cooler.
No dehumidification. Traditional air conditioners remove moisture from the air, except in very dry locations where recirculation can lead to a buildup of humidity. Evaporative cooling adds moisture, but in dry climates, dryness may improve thermal comfort at higher temperatures.
Comfort
The air supplied by the evaporative cooler is typically 80–90% relative humidity; very humid air reduces the evaporation rate of moisture from the skin, nose, lungs, and eyes.
High humidity in air accelerates corrosion, particularly in the presence of dust. This can considerably shorten the life of electronic and other equipment.
High humidity in air may cause condensation of water. This can be a problem for some situations (e.g., electrical equipment, computers, paper, books, old wood).
Water
Evaporative coolers require a constant supply of water to wet the pads.
Water high in mineral content will leave mineral deposits on the pads and interior of the cooler. Depending on the type and concentration of minerals, possible safety hazards during the replacement and waste removal of the pads could be present. Bleed-off and refill (purge pump) systems may reduce this problem.
31.4 Measuring Instruments: Temperature, Radiation, Relative humidity, Air flow, Photosynthesis, Soil temperature
Temperature
Thermometer: A thermometer is a device that measures temperature or temperature gradient using a variety of different principles. A thermometer has two important elements: the temperature sensor (e.g. the bulb on a mercury-in-glass thermometer) in which some physical change occurs with temperature, plus some means of converting this physical change into a numerical value (e.g. the visible scale that is marked on a mercury-in-glass thermometer).
Radiation
Lux meter: The lux (symbol: lx) is the SI unit of illuminance and luminous emittance, measuring luminous flux per unit area. It is equal to one lumen/m2. In photometry, this is used as a measure of the intensity, as perceived by the human eye, of light that hits or passes through a surface. It is analogous to the radiometric unit watts per square meter, but with the power at each wavelength weighted according to the luminosity function, a standardized model of human visual brightness perception. In English, "lux" is used in both singular and plural.
Relative humidity
Hygrometer: A hygrometer is an instrument used for measuring the moisture content in the environment. Humidity measurement instruments usually rely on measurements of some other quantity such as temperature, pressure, mass or a mechanical or electrical change in a substance as moisture is absorbed. By calibration and calculation, these measured quantities can lead to a measurement of humidity.
Air flow
Anemometer: An anemometer is a device for measuring wind speed, and is a common weather station instrument. The term is derived from the Greek word anemos, meaning wind, and is used to describe any air-speed measurement instrument used in meteorology or aerodynamics.
Photosynthesis
Photosynthesis meter: This device is used for measuring the photosynthesis.
Soil temperature
Soil thermometer: A soil thermometer is a thermometer specifically designed to measure soil temperature.
Reference
http://www.envirocept.com/gh_guide/greenhouse_lighting.html
www.agrifoodgateway.com/articles/greenhouse-ventilation
http://www.omafra.gov.on.ca/english/crops/facts/00-077.htm
www.ncpahindia.com/articles/article17.pdf
www.greenzonelife.com/greenhouses/greenhouse-heating.html
http://www.charleysgreenhouse.com/index.cfm?page=_summer_greenhouse
Suggested Reading
Ghosh, A. (2009). Greenhouse Technology (The Future Concept of Horticulture). Kalyani Publishers, New Delhi.
Prasad, S. and Kumar, U. (2003). Greenhouse Management for Horticultural Crops. Agrobios (India), Jodhpur
Last modified: Monday, 20 January 2014, 12:04 PM