Module 8. Electrical measuring instruments
Lesson 27
CHARACTERISTICS OF MEASURING INSTRUMENTS
27.1 Introduction
To understand the performance characteristics of a measurement system is very critical to the process of selection. Characteristics that show the performance of an instrument are accuracy, precision, resolution, sensitivity etc. It allows users to select the most suitable instrument for specific measuring jobs.
There are two basic performance characteristics of measuring instrument:
1. Static characteristics: value of the measured variable change slowly.
2. Dynamic characteristics: value of the measured variable change very fast.
27.2 Static Characteristics
The static characteristics and parameters of measuring instruments describe the performance of the instruments related to the steady-state input/output variables only. The various static characteristics and parameters are destined for quantitative description of the instrument’s perfections and they are well presented in the manufacturer's manuals and data sheets.
27.2.1 Accuracy
The degree of exactness (closeness) of measurement compared to the true value. This term is used in the manufacturer specifications for a measurement instrument or device. Accuracy of an instrument is the quality which characterizes the ability of a measuring instrument to give indications approximating to the true value of the measured variable. The specifications of the accuracy are given actually in terms of error (in other words in terms of inaccuracy). Note, that when the accuracy of some measurement device is presented with percent error, we can estimate the error after measurement.
Example: Let us consider a voltmeter having range from 0 to 200V and accuracy X=± 1% of range. The voltmeter reading is 100V. We can obtain the limits of absolute error after measurement:
Error = 1% of (200-0) = 2V
Finally for measurement we can write the result of measurement such as:
V = VR ± V= 100V ± 2V
and we say, that the measurement value is between 98 and 102 Volts.
27.2.2 Resolution
The smallest change in a measurement variable to which an instrument will respond.
27.2.3 Range
The input range of an measuring device is specified by the minimum and maximum values of input variable (Xmin to Xmax) , for example: from -10 to +150 oC (for the measurement device with temperature input).
The output range of an measuring device is specified by the minimum and maximum values of output variable (Ymin to Ymax) , for example: from 4 to +20 mA (for the measurement element with current output).
27.2.4 Span
The input span of a measuring devices is specified by the difference between maximum Xmax and minimum Xmin values of input variables: (Xmax - Xmin ). For example, for a measuring devices with input range from -10 oC to +150 oC the input span is: +150 oC - (-10 oC) = 160 oC.
The output span of a measuring devices is specified by the difference between maximum Ymax and minimum Ymin values of output variables: (Ymax - Ymin). For example, for a measuring devices with output range from 4 to +20 mA span is: +20 mA - 4 mA = 16 mA.
27.2.5 Precision
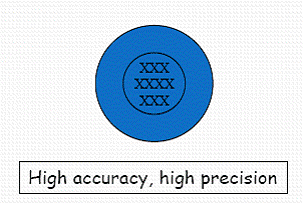
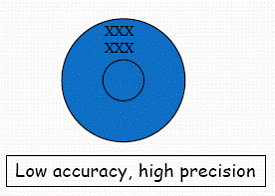
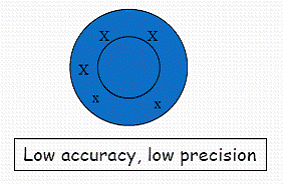
It is a measure of consistency or repeatability, i.e successive reading do not differ. Precision is defined as the capability of an instrument to show the same reading when used each time (reproducibility of the instrument). An instrument which is precise may not be necessarily accurate. Difference between accuracy and precision can be explained by example of a shooter aiming at the target (Fig. 27.1). If all the shots are hit at the particular point it is said to have high precision.


Fig. 27.1 Accuracy and precision
27.2.6 Bias
Constant error which occurs during the measurement of an instrument. This error is usually rectified through calibration.
27.2.7 Linearity
· Maximum deviation from linear relation between input and output.
· The output of an instrument has to be linearly proportionate to the measured quantity.
· Normally shown in the form of full scale percentage (% fs).
· The graph shows the output reading of an instrument when a few input readings are entered.

Fig. 27.2 Linearity
27.2.8 Sensitivity
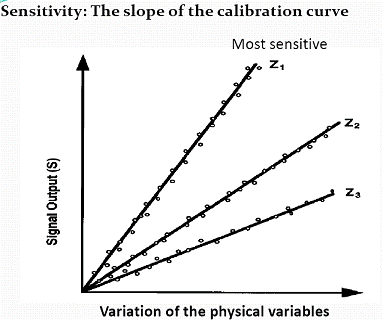
Sensitivity is defined as the ratio of change in output (response) towards the change in input at a steady state condition.

Where,
∆θo =
Change
in output
∆θi = Change in input

Fig. 27.3 Sensitivity
27.2.9 Threshold
When the reading of an input is increased from zero, the input reading will reach a certain value before change occurs in the output. The minimum limit of the input reading is ‘threshold’.
27.2.10 Expected value
It is the desired value or the most probable value that is expected to obtain.
27.2.11 Error
It is the deviation of the true value from the desired value. Also, Error (e) is the difference between the measured value and the true value of a variable.
e = measured value - true value
27.2.12 Accuracy
· True Value is the exact value of a variable.
· Measured Value - value of variable as indicated by measurement system
· Accuracy - closeness of agreement between the measured value and the true value.
27.3 Dynamic Characteristics
Previous characteristics assume a steady state conditions. The time response shows the behavior of the sensor or the instrument at system to the changes in the magnitude of interest by observing the signal output with time. The step response is used as a basic test and for characterizing the system. The dynamic characteristics of an instrument are:
· Speed of response
· Dynamic error: The difference between the true and measured value with no static error.
· Lag – response delay
· Fidelity – the degree to which an instrument indicates the changes in the measured variable without dynamic error (faithful reproduction).