Site pages
Current course
Participants
General
Module 1
Module 2.
Module 3.
Module 4
LESSON 3. Maintenance after 50 hours of tractor operation
Servicing after each 50-60 hours of tractor operation
1. Repeat the 10 hour service schedule
2. Maintenance of Tractor Battery: -Inspect the battery for loose terminals and electrolyte level.Wash the battery top with washing soda using warm water and grease the terminals 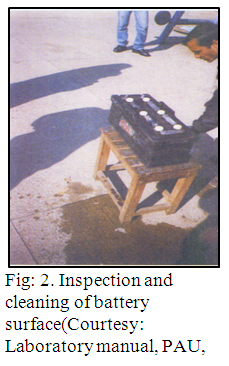
with petroleum jelly to prevent corrosion. This in general includes the maintenance of battery which in turn refers to maintaining the battery electrolyte level and checking battery condition, battery frame and cable connections. Water from a battery solution is lost daily due to evaporation and mainly because of chemical action when it is being charged. If electrolyte level is not restored then battery plates are exposed to air and get corroded. Loss of water results in concentration of acid and breaking down of separators and plates and consequently loss of battery life. Battery liquid level should be maintained 10mm above plates. Avoid over filling, as it might cause splashing through holes. It is important that battery is maintained at or near full charge. Sulfation occurs at less charge which decreases battery life. Secondly in cold weather battery capacity gets reduced. Battery condition is checked with the help of hydrometer and cell tester. Attention to the following points will help to get a long life from the battery.
a) Keep the battery electrolyte level with distilled water. The electrolyte or battery solution should be about 10 mm above the plates. Never allow the level of battery solution drop below the top of plates.
b) Never allow the voltage of the cells drop below a terminal voltage of 1.5V.
c) The holes in the vent plugs must be clear. Vent holes allow the battery to breathe, especially when being charged.
d) The terminal should be clean, tight and lightly coated with petroleum jelly.
e) Connections should be kept tight.
f) The battery should be securely held in its box. If it moves above, the case may get damaged.
g) The top of battery should be kept clean & dry to stop leakage of electricity from one cell to another. Wipe out dirt, dust and any acid which splashed out of the battery.
h) Keep the earth strap tight. This is lead from the tractor chassis to the earth terminal on the battery.
i) Always charge the batteries to their full rated capacity. If the battery is not used for long periods, it should be taken off the tractor & stored in a cool shed. It should be charged once a month especially in winter.
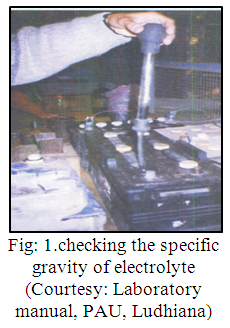
Testing of battery charge with hydrometer: Open battery cap, insert hydrometer nozzle in a cell, compress bulb and then slowly release the pressure to draw electrolyte into barrel. Adjust electrolyte level till float rides freely. Hold hydrometer vertically and take reading, take temperature of electrolyte and apply temperature correction. The specific gravity adjustment is made by adding or subtracting 0.004 for each 10° increase or decrease of temperature from 800F respectively. Add electrolyte to the cell. Flush hydrometer with clean water. Check the remaining cell in similar manner. Interpret result with the help of following table-
|
Specific. Gravity of cell |
Interpretation |
|
1.300 |
Electrolyte level low or battery over charge |
|
1.225-1.1.280 |
Battery in good condition |
|
1.225 |
Battery charge too low |
Testing with cell tester:
Cell should indicate voltage of 2 volts or above when prongs of cell tester applied on positive and negative plates of the same cell.
Checking battery frame and cable connections:
If battery fitting clamps on the tractor are loose, battery is subjected to excessive vibrations and plates may get damaged. Loose terminals provide excessive resistance to flow of current and thus result in excessive damage to battery. Ensure that the cable connections are tight.
3. Check the fan-belt tension and adjust it if required: V-belts are designed to ride on the sides of pulleys. Too tight v-belts increase the wear of the belt and bearing. Too loose belt cause belt slippage which effects less engine cooling and battery charge. Due to belt slippage the alternator will not run at recommended speed to give satisfactory charging rate of battery.It is important to keep the belt clean from dirt and grease as these will soften belt and cause permanent damage.Fan belt tension can be measured with the help of wooden strip and a measuring rule by applying normal pressure with hand. This deflection should not exceed 20 mm or double the width of belt whichever is less.
4.Cleaning and servicing air cleaner:
Clean and wash with kerosene/diesel the complete air cleaner. This refers to complete servicing ofair cleaner. A badly maintained air cleaner starve the engine of air. This will cause loss of power, fuel wastage and undue engine wear. If dirt in the oil bath gets settled up to 5 mm, it should be cleaned & filled with fresh engine oil. If dirt and dust is allowed to reach the engine cylinders, this will result in wearing-and damaging valve seats, piston rings and cylinder walls with subsequent loss in engine power.
It has been observed that everyone litre of fuel requires about 8000 to 9000 litres of air to burn it completely. This air is drawn from the atmosphere which contains dust or dirt. This dirt is removed from the air by the air cleaner.
Two types of air cleaners are in use:
a) Oil bath typeair cleaner and
b) Dry type air cleaner
a)Servicing oil bath type air cleaner
To service the air cleaner "Oil bath type" following steps should be observed:
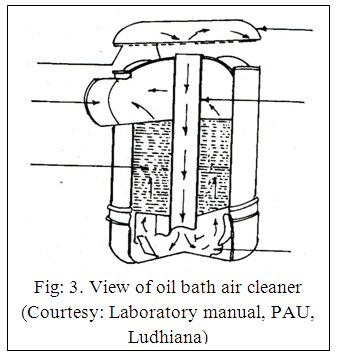
a) Dismantle the air cleaner assembly completely.
b) Remove pre-cleaner and clean it with air under pressure by passing air in the opposite direction of its normal flow.
c) Remove the top screen and clean it with kerosene or diesel with the help of brush.
d) Remove the used oil, clean with diesel and refill with fresh mobile oil to the level indicated.
e) Clean air hose and air pipe with compressed air.
f) Assemble the air cleaner assembly and attach it securely into its mountingon the tractor.
b)Servicing of dry type air cleaner
Followall the above steps for dry type of air cleaner except for "d" where element is cleaned by tapping or compressed air. It can also be cleaned with detergent if available.
5. Servicing of fuel supply system: This includes
a) Check the fuel line for any leakage and clean it.
b) Clean the sediment bowl and the screen.
The purpose of a sediment bowl is to allow water to settle out and to catch particles of scale rust and other foreign material. Moisture is a problem is fuel for all type of engines, it is worst with diesel engine. This causes damage by promoting rust. So it is essential to clean it and following procedure is adopted
a) Close fuel cock on fuel supply line
b) Loosen the nut that holds the sediment bowl
c) Remove bowl with twisting motion
d) Remove gasket.
e) Remove strainer screen or filter
f) Wash screen or filter element with diesel.
g) Clean sediment bowl by washing with diesel or kerosene"
h) Open fuel cock and observe flow
i) Reinstall gasket, strainer and sediment bowl
j) Tighten bowl against gasket
k) Open fuel cock starts your tractor and check for leaks
6. Check and adjust the brakes for proper operation:
As long as tractor speeds are slow uneven brake adjustment may not be too serious. But with higher tractor speeds available in most present day tractors uneven brake adjustment could easily damage the tractor. Two types of brakes are used in tractor.
i) Shoe brakes &
ii) Disc brakes
When brakes are correctly adjusted it should be possible to press the brake pedals by approximately 3/4"(19 mm) before brakes are applied. This provides a running clearance to prevent the brakes continuously rubbing and overheating.
Adjusting the brakes
a) Check/see what provision is made for brake adjusting
b) Jack up rear of tractor until both rear wheels are clean of the ground
c) Release the brake interlock
d) Tighten adjusting screw, adjusting rod through the adjustment screw as per match with the manual.
e) Slacken the adjuster screw until the wheel revolves freely without shoe rubbing on the drum
f) Adjust second brake in the similar manner
g) Check to make sure that brakes are equalised tractor from jack test:
Brake Test: - Lock both the brakes. Drive tractor on a hard and level surfaceat about 5-7 km/h speed. Apply brakes simultaneously. If the tractor slows/veers in either direction the brake on that side is adjusted too tightly or the opposite too slackly. Uneven, braking may be rectified by adjusting the linkage of each brake in accordance with manufactures instructions until the tractor can be stopped without tending to slot in either direction
7. Check and adjust the engine clutch:
A clutch will operate for longer period, unless' the driver has been operating the tractor with his foot resting on the clutch pedal. The clutch pedal should be adjusted to give a free play of 10-15 mm. The setting is obtained by adjusting the screw until the required measurement is obtained.
Insufficient free movement prevents the clutch form engaging fully and lead to clutch slip, clutch overheating and rapid wear of the lining materials on the clutch plate. Once the clutch start slipping it will wear out very rapidly, it is very necessary to adjust it to avoid wear. Following steps are followed to undertake the correct free travel.

Following steps are followed to undertake the correct free travel.
Determine from your operator manual how much free travel is needed (10-15 mm)
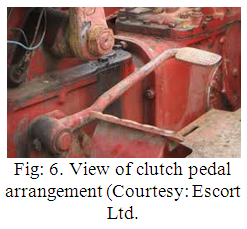
a) Measure the clutch free movement
b) Locate means provided for this adjustment
c) Loosen screw nut or bolts and move the pedal round the clutch release shaft to required adjustment
d) Check clutch pedal free travel
e) Tighten lock nut so that it holds adjustment securely
8. Lubricate:
Lubricate the following:
a) Fan-hub bearing
b) Throttle-control lever
c) Engine-clutch-release bearing, and
d) Alternator bearing
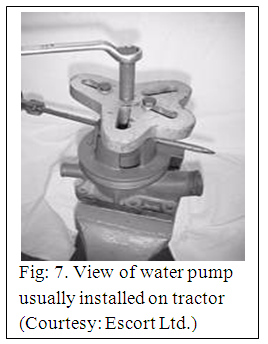
9. Check the water-pump (water body) for leakage and tighten or replace the packing, if required.
10. Loosen the vent plug and the drain-tap of the primary fuel filter and run off a small quantity of fuel in order to remove any water which might have accumulated.
References:
Sharma D N. & S. Mukesh (2004). Design of Agricultural Tractor (Principles and Problems)Book Pub. Jain Brothers, New Delhi
Wadhwa D.S., Dhingra H. S. & Santokh Singh, Field operation and maintenance of tractor and farm machinery (FMP-301), laboratory manual, Department of Farm Machinery and Power Engineering, PAU Ludhiana
Service and Maintenance Manual of Tractor,Escorts Ltd., Faridabad
Last modified: Monday, 10 February 2014, 4:34 AM