Site pages
Current course
Participants
General
MODULE 1.
MODULE 2.
MODULE 3.
MODULE 4.
MODULE 5.
MODULE 6.
MODULE 7.
MODULE 8.
MODULE 9.
MODULE 10.
MODULE 11.
MODULE 12.
LESSON 6. Design of Riveted Connections
6.1 INTRODUCTION
The perfect theoretical analysis for stress distribution in riveted connections cannot be established. Hence a large factor of safety is employed in the design of riveted connections. The riveted connections should be as strong as the structural members. No part in the riveted connections should be so overstressed. The riveted connections should be so designed that there is neither any permanent distortion nor any wear. These should be elastic. In general, the work of fabrication is completed in the workshops where the steel is fabricated.
6.2 ASSUMPTIONS FOR THE DESIGN OF RIVETED JOINT
Procedure for design of a riveted joint is simplified by making the following assumptions and by keeping in view the safety of the joint.
Load is assumed to be uniformly distributed among all the rivets
Stress in plate is assumed to be uniform
Shear stress is assumed to be uniformly distributed over the gross area of rivets
Bearing stress is assumed to be uniform between the contact surfaces of plate and rivet
Bending stress in rivet is neglected
Rivet hole is assumed to be completely filled by the rivet
Friction between plates is neglected
6.3 ARRANGEMENT OF RIVETS
Rivets in a riveted joint are arranged in two forms, namely, 1. Chain riveting, 2. Diamond riveting.
6.3.1 Chain Riveting: In chain riveting the rivets are arranged as shown in Fig. 6.1 and in the figure 1-1, 2-2 and 3-3 shows sections on either side of the joint. Section 1-1 is the critical section as compared to the other section. At section 2-2 is equal to the strength of plate in tearing at 2-2 plus strength of three rivets in bearing or shearing whichever is less at 1-1. At section 3-3 is equal to the strength of plate in tearing at 3-3 plus strength of rivets in bearing or shearing whichever is less (6 nos.).

Therefore,
Strength of plate in tearing at 1-1 = (b-3D).t.pt
Where b= width of the plate; D=Gross diameter of the rivet and t=Thickness of the plate.
When safe load carried by the joint (P) is known, width of the plate can be found as follows;
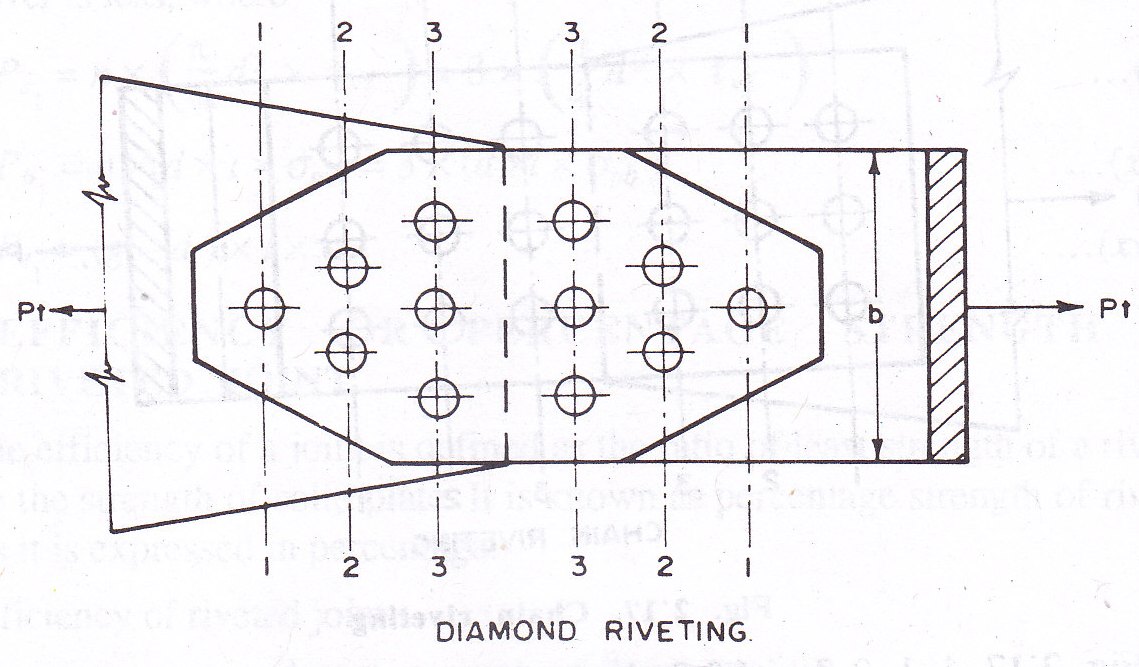
6.3.2 Diamond Riveting: In diamond riveting, rivets are arranged as shown in Fig.6.2. All the rivets are arranged symmetrically about the centre line of the plate. Section 1-1 is the critical section. Strength of the plate in tearing in diamond riveting section 1-1 can be computed as follows

When the safe load carried by the joint (P) is known, width of the plate can be found as follows
Where b=width of the plate, D=gross diameter of the rivet and t=thickness of the plate.
At section 2-2: All the rivets are stressed uniformly, hence strength of the plate at section 2-2 is
At section 3-3,
In diamond riveting there is saving of material and efficiency is more. Diamond riveting is used in bridge trusses generally.
6.4 SPECIFICATION FOR DESIGN OF RIVETED JOINT
6.4.1 Members meeting at Joint: The centroidal axes of the members meeting at a joint should intersect at one point, and if there is any eccentricity, adequate resistance should be provided in the connection.
6.4.2 Centre of Gravity: The centre of gravity of group of rivets should be on the line of action of load whenever practicable.
6.4.3 Pitch:
a. Minimum pitch: The distance between centres of adjacent rivets should not be less than 2.5 times the gross diameter of the rivet.
b. Maximum pitch: Maximum pitch should not exceed 12t or 200 mm whichever is less in compression member and 16t or 200 mm whichever is less in case of tension members, when the line of rivets lies along the line of action of force. If the line of rivets does not lie along the line of action of force, its maximum pitch should not exceed 32t or 300 mm whichever is less, where t is the thickness of the outside plate.
6.4.4 Edge Distance: A minimum edge distance of approximately 1.5 times the gross diameter of the rivet measured from the centre of the rivet hole is provided in the rivet joint. Table 6.1 gives the minimum edge distance as per recommendations of BIS in IS : 800-1984.
TABLE 6.1 EDGE DISTANCE OF HOLES
6.5 DESIGN PROCEDURE FOR RIVETED JOINT
For the design of a lap joint or butt joint, the thickness of plates to be joined is known and the joints are designed for the full strength of the plate. For the design of a structural steel work, force (pull or push) to be transmitted by the joint is known and riveted joints can be designed. Following are the usual steps for the design of the riveted joint:
Step 1:
The size of the rivet is determined by the Unwin’s formula
Where d= nominal diameter of rivet in mm and t= thickness of plate in mm.
The diameter of the rivet computed is rounded off to available size of rivets. Rivets are manufactured in nominal diameters of 12, 14, 16, 18, 20, 22, 24, 27, 30, 33, 36, 39, 42 and 48 mm
Step 2:
The strength of rivets in shearing and bearing are computed. Working stresses in rivets and plates are adopted as per ISI. Rivet value R is found. For designing lap joint or butt joint tearing strength of plate is determined as follows
Pt=(p-D).t.pt
Where p=pitch of rivets adopted, t=thickness of plate and pt = working stress in direct tension for plate. Tearing strength of plate should not exceed the rivet value R (Ps or Pb whichever is less) or
From this relation pitch of the rivets is determined.
Step 3:
In structural steel work, force to be transmitted by the riveted joint and the rivet value are known. Hence number of rivets required can be computed as follows
The number of rivets thus obtained is provided on one side of the joint and an equal number of rivets is provided on the other side of joint also.
Step 4:
For the design of joint in a tie member consisting of a flat, width/thickness of the flat is known. The section is assumed to be reduced by rivet holes depending upon the arrangements of the rivets to be provided, strength of flat at the weakest section is equated to the pull transmitted by the joint. For example, assuming the section to be weakened by one rivet and also assuming that the thickness of the flat is known we have
Where b= width of flat, t=thickness of flat, pt=working stress in tension in plate and P=pull to be transmitted by the joint. From this equation, width of the flat can be determined.
Example 6.1: A single riveted lap joint is used to connect plate 10 mm thick. If 20 mm diameter rivets are used at 55 mm pitch, determine the strength of joint and its efficiency. Working stress in shear in rivets=80 N/mm2 (MPa). Working stress in bearing in rivets=250 N/mm2 (MPa). Working stress in axial tension in plates=156 N/mm2.
Solution
Assume that power driven field rivets are used. Nominal diameter of rivet (D) is 20 mm and gross diameter of rivet is 21.5 mm.
Strength of rivet in single shear = (π/4) x 21.52 x 80/1000
Ps = 29.044 kN
Strength of rivet in bearing = 21.5 x 10 x 250/1000
Pb = 53.750 kN
Strength of plate in tension per gauge length = Pt=(p-D).t.pt
Pt = (55-21.5) x 10 x 156/1000
= 52.260 kN
Strength of joint is minimum of Ps, Pb or Pt
Therefore, the strength of joint is = 29.044 kN
Efficiency of joint
Example 6.2: A double riveted double cover butt joint is used to connect plates 12 mm thick. Using Unwin’s formula, determine the diameter of rivet, rivet value, pitch and efficiency of joint. Adopt the following stresses;
Working stress in shear in power driven rivets=100 N/mm2 (MPa).
Working stress in bearing in power driven rivets=300 N/mm2 (MPa).
For plates working stress in axial tension =156 N/mm2.
Solution
Nominal diameter of rivet from Unwin’s formula
Adopt nominal diameter of rivet = 22 mm; Gross diameter of rivet = 23.5 mm
Strength of rivet in double shear =
Strength of rivet in bearing = D x t x pb = 23.5 x 12 x 300/1000 = 84.6 kN
The strength of a rivet in shearing and in bearing is computed and the lesser is called the rivet value (R). Hence the Rivet value is 84.6 kN.
Let p be the pitch of the rivets. Pt = (p-D) x t x pt = ((p-23.5) x 12 x 156/100) =1.872 (p-23.5) kN
In double riveted joint,
Strength of 2 rivets in shear Ps = 2 x 86.75 = 173.5 kN
Strength of 2 rivets in bearing Pb = 2 x 84.6 = 169.2 kN
The pitch of the rivets can be computed by keeping Pt = Ps or Pb whichever is less
Therefore 1.872 (p-23.5) = 169.2
p-23.5 = (169.2/1.872) = 90.385
p= 90.385 + 23.5 = 113.885 mm
Adopt pitch, p= 100 mm
Example 6.3: A double cover butt joint is used to connect plates 16 mm thick. Design the riveted joint and determine its efficiency.
Solution
Nominal diameter of rivet from Unwin’s formula
The hot driven rivets of 16 mm, 18 mm, 20 mm and 22 mm diameter are used for the structural steel works. Unwin’s formula gives higher values. Hence, adopt nominal diameter of rivet = 22 mm; Gross diameter of rivet = 22 +1.5 = 23.5 mm
In double cover butt joint, rivets are in double shear. As per IS : 800-84,
Shear stress for power driven rivets=100 N/mm2 (MPa).
Bearing stress for power driven rivets=300 N/mm2 (MPa).
Strength of plate in tension =156 N/mm2.
Strength of rivet in double shear =
Strength of rivet in bearing = D x t x pb = 23.5 x 16 x 300/1000 = 112.8 kN
The strength of a rivet in shearing and in bearing is computed and the lesser is called the rivet value (R). Hence the Rivet value is 86.75 kN.
Let p be the pitch of the rivets. Pt = (p-D) x t x pt = ((p-23.5) x 16 x 156/100) =2.496 (p-23.5) kN
The pitch of the rivets can be computed by keeping Pt = Ps or Pb whichever is less
Therefore 2.496 (p-23.5) = 86.75
(p-23.5) = (86.75/2.496) = 34.756
p= 34.756 + 23.5 = 58.256 mm
Adopt pitch, p= 55 mm
Adopt thickness of each cover plate t ≈ 5/8 x 16 ≈ 10 mm
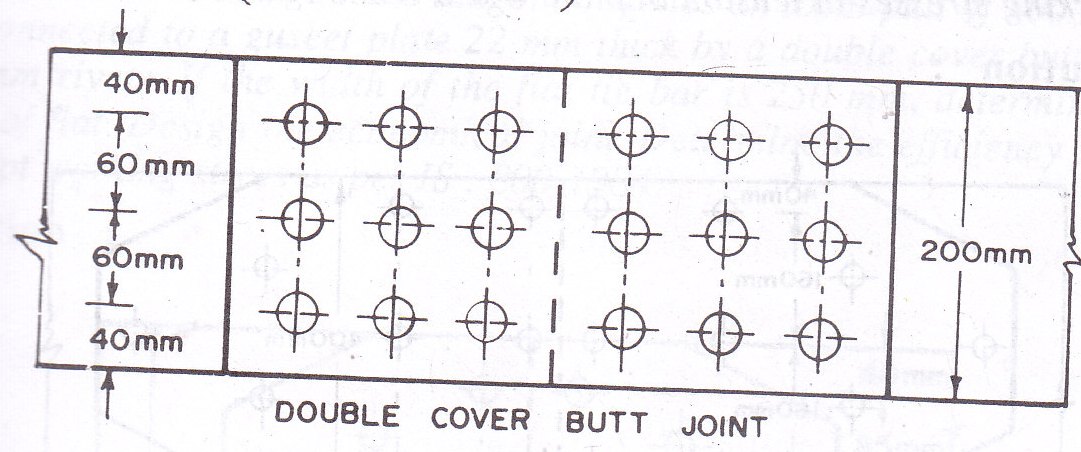
Example 6.4: Determine the strength of a double cover butt joint used to connect two flats 200 F 12. The thickness of each cover plate is 8 mm. Flats have been joined by 9 rivets in chain riveting at a gauge of 60 mm as shown in Fig. 6.3. What is the efficiency of the joint? Adopt working stresses in rivets and flats as per IS : 800-84.

Solution
Size of flat used = 200 F 12
Width of flat = 200 mm
Thickness of flat = 12 mm
Use power driven rivets
Nominal diameter of rivet from Unwin’s formula
Adopt nominal diameter of rivet = 22 mm; Gross diameter of rivet D = 23.5 mm
Strength of rivet in double shear =
Strength of rivet in bearing = D x t x pb = 23.5 x 12 x 300/1000 = 84.6 kN
Strength of joint in shear, Ps = 9 x 86.75 = 780.75 kN
Strength of joint in bearing Pb = 9 x 84.6 = 761.40 kN
Strength of plate in tearing Pt = (b-3D) x t x pt
= ((200-3x23.5) x 12 x 156/1000)
= 242.42 kN
Strength of joint is minimum of Ps, Pb or Pt
Therefore, the strength of joint is = 242.42 kN
Example 6.5: In a truss girder of a bridge, a diagonal consists of a 16 mm thick flat and carries a pull of 750 kN and is connected to a gusset plate by a double cover butt joint. The thickness of each cover plate is 8 mm. Determine the number of rivets necessary and the width of the flat required. What is the efficiency of the joint? Sketch the joint. Take
Working stress in shear in power driven rivets=100 N/mm2 (MPa).
Working stress in bearing in power driven rivets=300 N/mm2 (MPa).
For plates working stress in axial tension =156 N/mm2.

Solution
Nominal diameter of rivet from Unwin’s formula
The hot driven rivets of 16 mm, 18 mm, 20 mm and 22 mm diameter are used for the structural steel works. Unwin’s formula gives higher values. Hence, adopt nominal diameter of rivet = 22 mm; Gross diameter of rivet = 22 +1.5 = 23.5 mm
Strength of rivet in double shear =
Strength of rivet in bearing = D x t x pb = 23.5 x 16 x 300/1000 = 112.8 kN
The strength of a rivet in shearing and in bearing is computed and the lesser is called the rivet value (R). Hence the Rivet value is 86.75 kN.
Number of rivets required to transmit pull of 750 kN n= (750/86.75) = 8.67 ≈ 9 rivets.
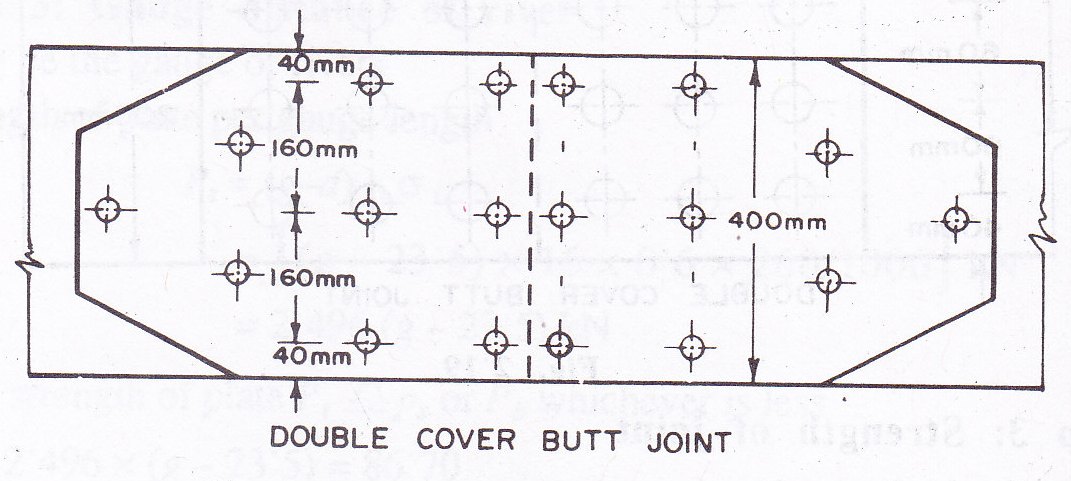
Using diamond group of riveting, flat is weakened by one rivet hole. Strength of plate at section 1-1 in teaing
Pt = (b-d) x t x pt = ((b-23.5) x 16 x 156/100) = 2.496 (b-23.5) kN
Since P = 750 kN, 2.496 (b-23.5) = 750
b=(750/2.496)+23.5 = 323.98 mm
Hence provide 400 mm width of diagonal member. The design of joint is shown in Fig. 6.4.
Efficiency of the joint
Example 6.6: A bridge truss diagonal carries an axial pull of 500 kN. It is to be connected to a gusset plate 22 mm thick by a double cover butt joint with 22 mm rivets. If the width of the tie bar is 250 mm, determine the thickness of flat. Design the economical joint. Determine the efficiency of the joint. Adopt working stresses in rivets and flats as per IS : 800-84.
Solution
Nominal diameter of rivet = 22 mm; Gross diameter of rivet = 23.5 mm
Strength of power driven rivet in double shear =
Strength of power driven rivet in bearing = D x t x pb = 23.5 x 22 x 300/1000 = 155.1 kN
The strength of a rivet in shearing and in bearing is computed and the lesser is called the rivet value (R). Hence the Rivet value is 86.75 kN.
Number of rivets required to transmit pull of 500 kN n= (500/86.75) = 5.76 ≈ 6 rivets.
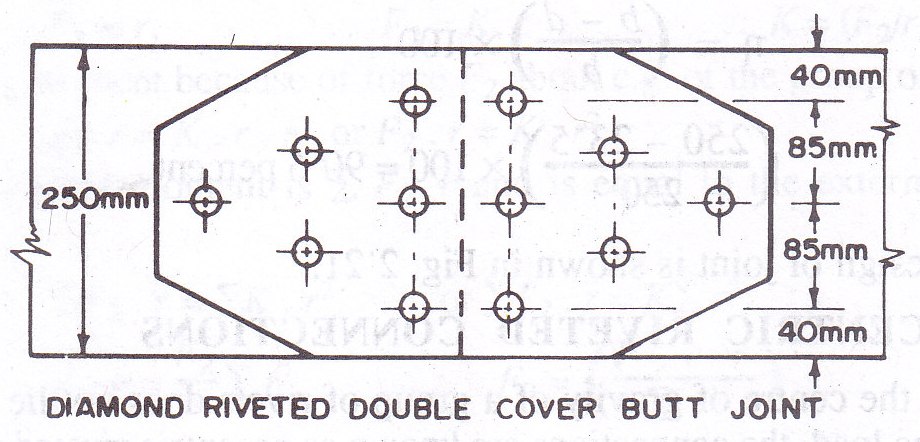
Provide six rivets in diamond group of riveting for efficient joint.
Let the thickness of flat be t mm
Strength of plate at weakest section Pt = (b-d) x t x pt = ((250-23.5) x t x 156/100) = 500 kN
Therefore t = 14.151 mm; Adopt 16 mm thickness of flat. Keep 40 mm edge distance from centre of rivet and 85 mm distance between centre to centre of rivet lines as shown in the Fig. 6.5.

Efficiency of joint