Site pages
Current course
Participants
General
Module 1
Module 2.
Module 3.
Module 4
LESSON 10. Mould board plough- Adjustment, operation and maintenance
1. Introduction
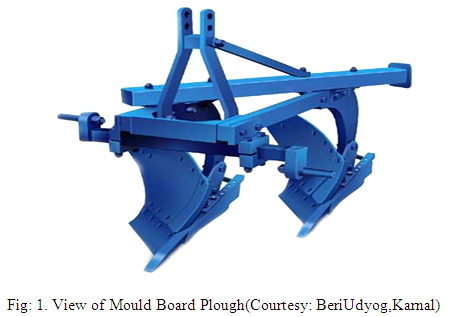
Mould board plough is one of the oldest of the all agricultural implements and is generally considered to be the most important tillage implement. Ploughing accounts for more traction energy than any other field operation. Although yield studies have indicated that under certain conditions with some crops there is no apparent advantage in plowing, the mould board plough is still by far the most used implement for primary tillage in seedbed preparation.
M.B. Plough is equipped with heavy-duty box frame specially designed for deep ploughing / land preparation of rough soil. It is designed to work in all types of soils for basic function such as soil breaking, soil raising and soil turning. It can handle the toughest ploughing job with outstanding penetration performance.
Regular and satisfactory operations together with economic and long lasting use of the implement depend on the compliance with manufacturer’s instructions.

2. Tractor preparations for field operations:
Instructions for tractor preparations
- The horsepower of tractor selected should match the implement.
- Adjust the front and rear wheel track width.
- Provide adequate front end ballast for tractor stability.
- All plough adjustment should be carried out.
- Select load and depth control setting according to tractor operators manual.
3. M.B. Plough Adjustments:
In order to get better results from M.B. Ploughing, the following adjustments are necessary:
a) Leveling the plough: - The level of the plough is controlled by the tractor top link. If the rear end of the plough beam is higher than the front end of the beam, lengthen the top link. If rear end of the plough beam is lower than the front end, then shorten the top link. Lateral leveling is controlled by adjusting the length of the tractor right lower link. These adjustments must be made with the plough prior to operation.
b) Horizontal Suction or Land Suction: Horizontal suction is the amount the point of share is bend off line with the land side. The object of the suction is to make the plough take the proper amount of furrow width. Horizontal suction is measured by placing a straight edge on the side of the plough extending from the heel of the landside to the point of share, then measuring horizontally the greatest distance from the straight edge to the plough bottom. The amount is usually about 3/16 inch.
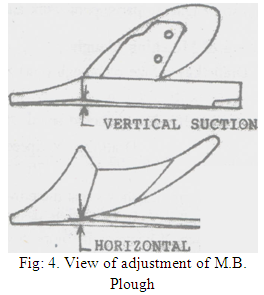
c) Vertical Suctionor Down Suction: This is the bend downward of the point of share to make the plough penetrate the soil to the proper depth when the plough is pulled forward. The amount of suction shall vary from 1/8 to 3/16 inch depending on the style of plough and the soil it will make to work in. This suction can be measured by placing a straight edge on the bottom of the plough extending from the heel of the bottom of land side to the point of share, then measuring vertically and the greatest clearance from the straight edge to the plough bottom.
d) Draft of the M B plough
The type of the soil is the greatest external factor to consider the draft of any plough. In very hard ground, it is often necessary to add weight to the wheels to force the plough into the soil.
Draft is also affected by the depth and width of cut per bottom for complete plough. Speed is also another factor which increases the draft, doubling the speed increases the draft by about 20 -25%.
e)Adjustment for deeper ploughing
The depth of the plough can be obtained by the position and draft control levers of the tractor hydraulic system. However more depth can be obtained by:
- Adding extra weight to the plough.
- Vertical suction
- If the ground is covered with trash, set the Plough in almost vertical position and add weight to the plough. In such soils notched Plough gives better results.
f) Warning for driver
- Before ploughing check all nuts and bolts of the MB.Plough.
- Don’t plough on stony soil.
- ractor should be in high first gear.
- If soil is hard then ploughing the field at least twice.
g) Danger
Before ploughing with M B Plough take care that nobody stands near it.
4. Usage instructions
a. Before mounting of M.B. plough make sure that all nuts and bolts are properly secured.
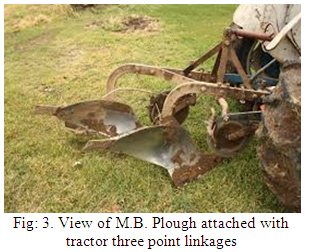
b. Attaching the plough to the tractor (Fig: 2.)
- Place the plough duly leveled on the flat piece of land.
- Reverse the tractor to the plough ( Do not drag the plough up the tractor)
- Attach the left arm of the tractor to the plough first.
- Attach the central arm to the plough. To attach, turn the screws on both sides to an equal length. If the arm is too short or too long, turn the screw to adjust both at the same time until aligned with the hole on the central arm.
- To attach the lower right arm, turn the screw until the mounting pin is at the same level as the hole on the tractor arm. If the gap between hole and mounting pin is too close or too distant, turn the control arm in or pull it away to an appropriate distance. You may have to adjust both height and distance at the same time. When the hole at tractor arm and mounting pin are even, insert the pin in the hole and lock it with the lynch pin.
- After attaching the plough lift it and adjust the control arm parallel to the ground. When you look from both rear or sideways, the point should all be touching the ground uniformly.
c. NOTE: -
The plough will work best when the right wheel of the tractor is inside the previously ploughed furrow. So that the plough is in one of the furrow. Readjust the plough alignments again if necessary.
d.Instructions for driver
- When M.B. plough is ready for use don't stand between M.B. plough & the tractor.
- Properly fit the three point linkage as mentioned above & lock with lynch pin.
- Never turn the tractor to the right or left when the plough is engaged in the soil.
- Never reverse the tractor when the plough is engaged in the soil.
5. Maintenanceof M.B. Plough:
If you work the M.B. Plough on stony land then maintenance also increases. Please follow these rules to get the best results:
- If M.B. plough is new then after first two hours of working tightened all nut bolts.
- Check the plough adjustments if the steering is hard.
- Constantly check for loose nuts and bolts.
- After every fifty hours tighten all nuts and bolts.
- Sharpen the Bar Point and shares if the shares are dull. Blunt shares increase the draft considerably.
6. Storage of machine after work
- Wash the M.B. plough after work
- Replace the worn out nuts and bolts.
- If M.B. plough has to remain unused for long time then clean it & apply a layer of used oil for rust prevention.
These steps will enhance the life of the M.B. Plough.
References:
Jain S. C. and Philp Grace (2003) Farm Machinery an approach.Book Pub. Standard Publisher and distributor, New Delhi
Wadhwa D.S., Dhingra H. S. &Santokh, Singh Field operation and maintenance of tractor and farm machinery (FMP-301), laboratory manual by, Department of Farm Machinery and Power Engineering, PAU Ludhiana
Service and maintenance manual of Mould Board Plough, BeriUdyogKarnal (Haryana)
Last modified: Tuesday, 18 February 2014, 4:25 AM