Site pages
Current course
Participants
General
Module 1
Module 2.
Module 3.
Module 4
LESSON 14. Adjustment, operation and maintenance of spraying equipment
Introduction
Spraying equipment or sprayer: Sprayer is a machine which is used to atomise the liquid chemical and spray at the plant uniformly.
A sprayer is a device used to apply chemical in liquid form for control of insects/ pests/ diseases.
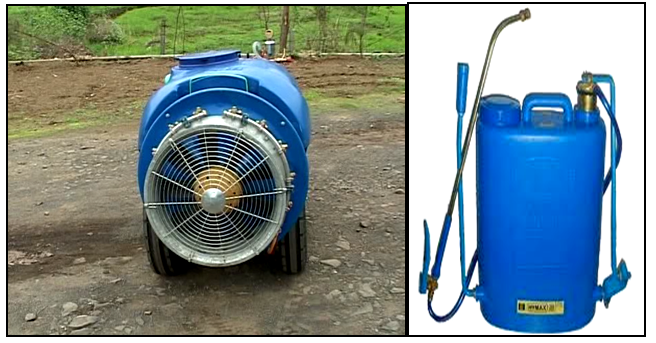
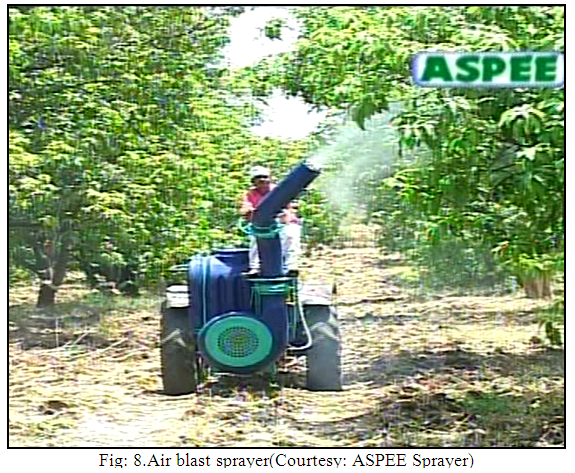
1. View of air blast sprayer and manually operated sprayer (Courtesy: ASPEE Sprayers)
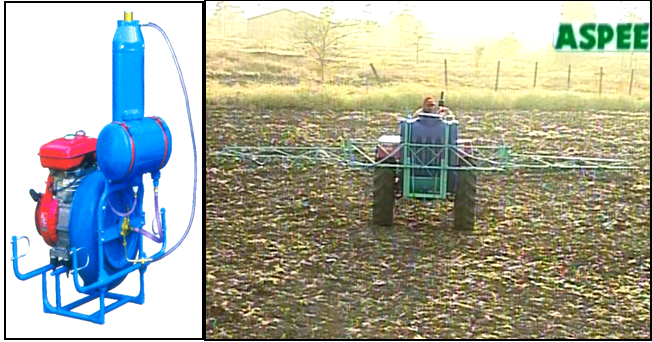
Fig: 2. View of mist blower Fig: 3. View of jet type sprayer (Courtesy: ASPEE Sprayers)
In agriculture,a sprayer is a piece of equipment that is used to apply herbicides,pesticides and fertilizers to agricultural crops. Sprayers range in size from man-portable units (typically backpack and spray guns) to trailed sprayers that are connected to a tractor, to self-propelled units.
1. Adjustments in sprayers:
A. Boom sprayers:
Spraying is the final defence in an integrated pest management plan, timed according to pest and plant development. For optimal results, make minor adjustments before each application, to account for changes in the crop (size, shape and canopy density), weather conditions (relative humidity, wind speed and wind direction), the nature of the pest and the product chemistry.
Often, in an effort to meet a strict spraying schedule, operators do not take the time to properly adjust their sprayers to match application conditions, resulting in over- or under-spraying. Over-spraying leads to unnecessary environmental contamination and financial loss due to run-off and drift; under-spraying requires more frequent applications to compensate for reduced protection and results in greater net waste compared to a schedule of applications that are correctly calibrated.
a)Sprayer output (Nozzle discharge rate):
Adjust sprayer output and distribution at least twice a year, to ensure the sprayer will uniformly cover the target with the optimal volume. The first adjustment should take place during calibration at the beginning of the season; the second when the target crop has grown and the canopy filled to such an extent that it requires different sprayer settings to achieve coverage. For example, apple trees at the 1-in. fruit stage of development require different sprayer settings than when they are at bud break - the tree is larger, fuller and requires more spray to cover the increase in surface area (i.e., leaves and fruit). At this stage, re-nozzle the sprayer to enable higher output and re-distributes the spray to match the shape and density of the target. Adjust deflector positions to ensure the spray just reaches the top of the highest tree in the block and does not spray below the canopy (Figure 1). Altering driving speed and/or pressure to account for wind or canopy density is common practice for making minor changes to spray quality and sprayer output, but changing nozzle tips is more accurate and is therefore the preferred method when possible.
b)Spray droplet size:
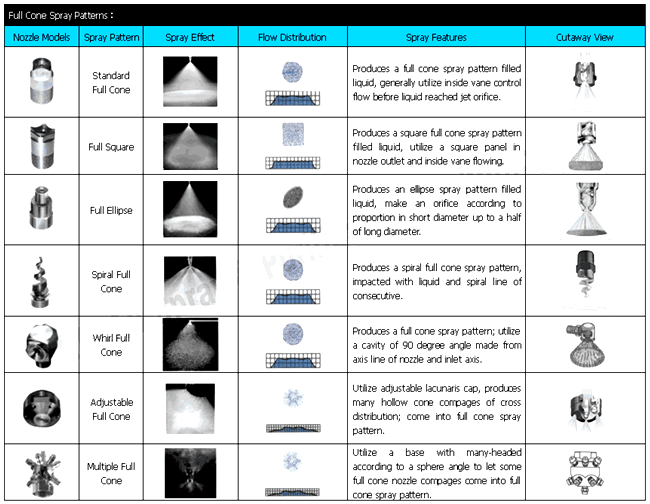
Spray droplet size is highly important for efficient and effective utilization of pesticides with minimum contamination of environment. Select optimum droplet size (mmd) for selection of type of nozzle to be used. Usually spray droplet size vary from coarse sprays (more than 400µm) to Aerosols (<50µm) and accordingly, a good sprayer should be able to produce droplets of uniform size.
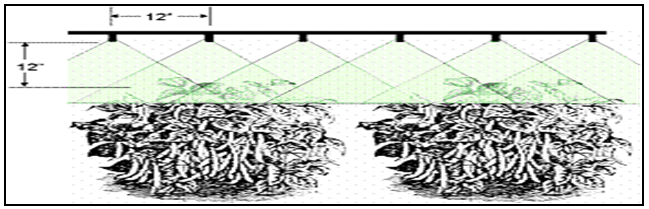
c)Uniformity of spray application:-
The uniformity of spray application on plants depends on:
- Spray boom/ lance height
- Spray angle and
- Degree of overlap (This depends on spray boom height = spray angle and nozzle spacing on boom)

B.Adjustments in T.D. Aero blast sprayer: -Aero blast sprayer (Fig: 8.) is a precision spraying equipment. It projects fine droplets of chemicals into the target by spraying liquid chemical from hydraulic nozzles into an entraining blast of air generated by fans or turbine directed by volute, deflectors or ducts.
a) Sprayer output volume: -
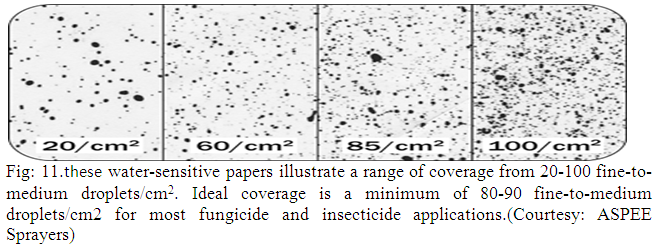
Optimal sprayer output volume is crop-specific. For apple orchards, it is generally 400-1,500 L/ha. With the exception of dormant oil drenches, the goal is to cover all target surfaces with a minimum droplet density of 80-90 fine-to-medium-sized droplets/cm². This can be difficult to achieve given that the outside of the canopy receives more coverage than the inside. Ideally, the canopy should not drip. Valuable feedback can be obtained through the use of water-sensitive paper placed throughout the target canopy.
b)Air speed and volume: It is equally important to change the speed and volume of carrier air over the season. In apple trees, the air should barely rustle the outer leaves in the next row. This means setting the air volume high and the air speed low (except to compensate for wind). Adjust air by using a lower PTO speed, gearing up and throttling down, adjusting blade pitch and/or installing a hydraulic motor to control fan speed.c) Spray distribution: -Fig: 9. depicts the spray distribution in apple trees and canopy of uniform length respectively while Fig: 10. depicts the range of droplets coverage.
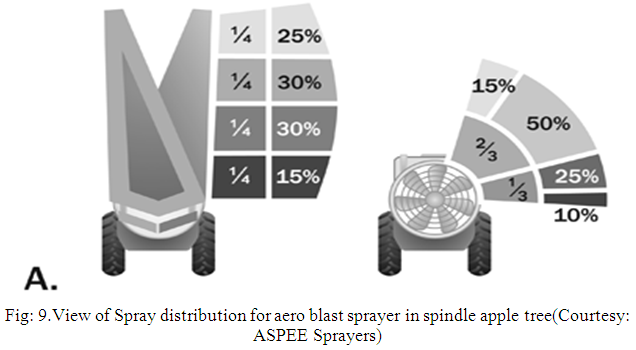

Fig: 10. View of spray distribution for aero blast sprayer
(Courtesy: ASPEE Sprayers)
3. Calibration of sprayers:
a) Calibration
To apply a specified rate of chemical to the target surface (e.g. plant, soil, pest);one need to measure the total spray output of the machine, the travel speed and the swath width. Then calculate the application rate.
b) Total sprayer output (L/min)
The aim here is to measure the total liquid sprayed from the spray machine in one minute. First, disengage the gearbox and set the engine revs (1500 is a good starting point) with the power take-off (PTO) engaged at a normal operating speed. Set the pressure at the correct level for spraying. The correct pressure is specified by the manufacturer and determined by the type of nozzles used. All nozzles used for spraying should be left on.
1. Fill the spray tank with clean water.
2. Place a measuring jug under one nozzle. To avoid personal wetting, attach a piece of plastic hose to the nozzle and place the other end into the jug.
3. Run the sprayer for one minute at the correct pressure with all nozzles operating.
4.Measure the quantity of water collected in the jug. Compare this to the output specified by the manufacturer using the correct pressure. Nozzle output should not vary by more than 10%. If it does, the nozzle could be worn or damaged and should be replaced. All nozzles on the boom should have a similar output.
5. Repeat steps 2–4 for all the nozzles.
6. Add all the jug measurements to find the total sprayer output in liters per minute.
c) Travel speed (km/h)
The normal speed for spraying with small boom sprayers in horticulture situations is 4–10 km/h. The slower one travels the higher is the application rate. A change in ground speed of 10% results in a 10% change in application rate. Adjust the travel speed to suit the ground conditions.
1. Measure out a distance of 100 meters on the ground to be sprayed and mark the start and finish positions with pegs.
2. Select the right gear and engine revolutions for spraying.
3. Measure the time in seconds it takes to travel 100 meters with the sprayer attached and half full.
4. Calculate sprayer travel speed by inserting the time in seconds into the following formula:
100 (m) x 3.6
Travel speed (km/h) =---------------------------
Time (seconds)
d) To calculate spray application rate (L/ha)
First, measure swath width (in meters). For general broadcast spraying, the swath width is equal to the number of nozzles multiplied by the nozzle spacing. For band spraying the swath width is equal to the total of all the band widths
Calculate the application rate using the following formula:
600 x total sprayer output (L/min)
Application rate (L/ha) = --------------------------------------------------
Swath width (m) x travel speed (km/h)
For example:
If total sprayer output is 5 L/min,& operating speed is 10 km/h, and the swath width is 5m, then application rate is:
600 x 5 3000
= --------------------- --------------------- = 60 L/ha
5 x 10 50
e) Benefits of calibration
By calibrating the spraying machine one can find out the spray application rate. This information is necessary whenever theuses of chemicals arespecified in amounts per hectare. It also helpsto work out how many spray tanks are needed for a particular spraying job.
The spray application rate varies for different crops, different row spacing and the age, heightand density of crops. This means it requires to calibrate for each crop or block.
Calibration ensures good coverage of the target surface and sprays the correct amount without wastage. It saves time and money, results in a more effective and efficient praying job, and protects the environment.
4. Safety precautions in operation of sprayers:
a) Precautions before spraying
- Identify the pest and ascertain the damage done
- Use pesticide only if crop damage has exceeded the Economical Injury Level.
- Use only the recommended least toxic pesticide.
- Read instructions manual of the pesticide and equipment.
- Check the spraying equipment and accessories which are to be used.
- Ascertain that all components are clean, especially filling and suction strainer, sprayer tank, cut off device and nozzles.
- Replace worn out parts such as 'O' ring, seal, and gasket, worn out nozzle tips, hose clamps and valves.
- Test the sprayer and ascertain whether it pumps the required liquid output at rated pressure. Check the nozzle spray pattern and discharge rate.
- Calibrate the sprayer. Set spraying speed and nozzle swath by adjusting spray height and nozzle spacing.
- Make sure that appropriate protective clothing is available and is used.
- Train all concerned with the application and also understands the recommendations.
- Ensure that soap, towel and plenty of water is available.
b) Precautions during spraying
- Take only sufficient pesticide for the day's application from the store to the site.
- Do not transfer pesticides from original container and packing into the containers.
- Recheck the use instructions of pesticide and equipment.
- Make sure pesticides are mixed in the correct quantities
- Wear appropriate clothing.
- Avoid contamination of the skin especially eyes and mouth.
- Liquid formulation should be poured carefully to avoid splashing.
- Do not spray in high wind, high temperature and rain.
- Avoid drift by selecting proper direction of spraying and also holding nozzle and boom at a proper height.
- Start spraying near the downwind edge of the field and proceed upwind so that operator moves into unsprayed area.
- Never eat, drink or smoke when mixing or applying pesticides. Never blow out clogged nozzles or hoses with mouth.
- Follow correct spray technique. Spray plant crop thoroughly by operating sprayer at correct speed and correct pressure.
- Never allow children or other unauthorized persons to be nearby during mixing.
- Never leave pesticides unattended in the field.
Never spray if the wind is blowing towards grazing livestock or pastures regularly used.
c) Precautions after spraying
- Remaining pesticides left in the tank after spraying should be emptied and disposed off in pits dug on wasteland.
- Never empty the tank into irrigation canals or ponds.
- Never leave unused pesticides in sprayers. Always clean equipment properly. After use, oil it and then keep away in store room.
- Do not use empty pesticide containers for any purpose.
- Crush and bury the containers preferably in a land filled dump.
- Clean buckets, sticks, measuring jars, etc. used in preparing the spray solution.
- Remove and wash protective clothing and footwear. Wash yourself well and put on clean clothing.
- Keep an accurate record of pesticide usage.
- Prevent persons from entering treated areas until it is safe to do so.
- Mark the sprayed plots with a flag.
5.Maintaining the sprayer: Airblast sprayers (Fig: 8.) are precision spray equipment that must be kept in good operating condition to ensure proper spray quality. Never assume that following the manufacturer's service instructions for winterizing a sprayer means it is ready for immediate hook-up and use in the coming season. Observe the following start-up steps before using the sprayer. This will prevent unnecessary and costly breakdowns and improper application, and may increase the lifespan of the spray equipment.
Step1. Pump maintenance
Before the first spray application of the year, pump clean water through the system until the discharge is clear of dirt, sludge or scale that might be present in the tank, pump, hoses, filters and nozzles. One of the most common causes for faulty pump performance is gumming or corrosion inside the pump. Flush the pump with a solution that will chemically neutralize the liquid pumped. Mix this solution according to the manufacturer's directions. This will dissolve most residues remaining in the pump, leaving the inside of the pump clean for the next use.
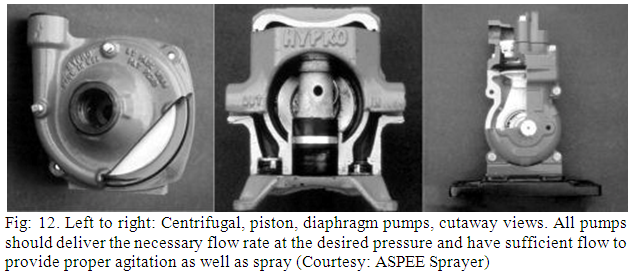
Diaphragm and piston pumps have moving parts in the fluid path (such as check valves), whereas centrifugal or roller pumps have none (Fig:12.). Change the oil and diaphragms every 500 hours of spraying or every 3 months, whichever comes first. Check all diaphragms and check valves for corrosion and wear. For a piston pump, inspect check valves, valve seats, O-rings, seals, plunger cups and cylinders. Check the packing for water or oil leaks. For centrifugal pumps, check for correct operating pressure and leaks. Replace the shaft seals to prevent leaks, or for older models, tighten the compression unit. Adjust the slinger ring so it is tight enough to rotate with the shaft and still prevent any spray mixture from contacting the shaft bearings.
The pump flow capacity should be 20% greater than the capacity needed to spray and run the tank agitation circuit. In most cases, agitation requires a higher flow rate than the total nozzle output. A relatively high pump capacity will maintain proper pressure and flow as the pump wears, if the nozzle size or quantity increase, or if travel speed increases during spraying.
At the end of the season, clean the pump and flush it with a 50% solution (half water) of permanent-type automobile antifreeze containing a rust inhibitor. A protective coating will remain on the inner pump surfaces. For short periods of idleness, non-corrosive liquids can remain in the pump, but air must be kept out. Plug the ports or seal port connections. Proper maintenance during and after the season will extend the life of the pump.
Step – 2 Hoses
The size of the hoses and their fittings affects the system capacity and pressure. Under-sized hoses and fittings can severely reduce the capacity of any pump. Suction hose diameter should be at least as large as the pump intake opening. Examine all hoses and connections for cracks or leaks. Hoses and fittings on the pressure side of the pump must be able to handle the maximum pressure the pump can develop and withstand pressure surges. Of particular concern is the suction hose, because an air leak in the suction line would seriously interfere with the operation of the pump and pressure gauge.
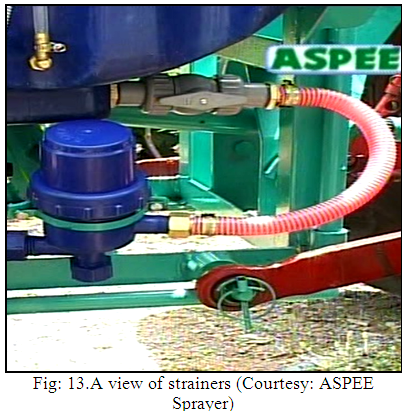
Step3.Strainers
Strainers (or filters) can be installed in the tank opening, between the tank and the pump, after the pump, and in the nozzle bodies. Scale the strainer size from the coarsest at the tank opening to the finest at the nozzle. Growers who do not use nozzle strainers because they feel they contribute to plugged nozzles may be using too small a nozzle strainer. Nozzle strainers capture debris before it damages nozzles and should be installed. Check the nozzle catalogue for the correct strainer gauge.
Check all strainers throughout the system, including the suction strainer (Fig: 13.). Any scale from the tank and lines is most likely to break free early in the season. If a strainer contains any sort of deposit, clean the tank and lines thoroughly. Remove the nozzle strainers and scrub them with a bristled brush; flushing will not clear them. Replace all cracked or poorly fitting strainers.
Step4. Regulator
Sprayer regulators with stem packing should be inspected annually. Tight packing restricts stem movement and could lead to fluctuations or dangerously high pressures. Loose packing may lead to leakage. Certain makes of airblast sprayer may not have adjustable regulators, and may use bypass valves for minor pressure adjustments.
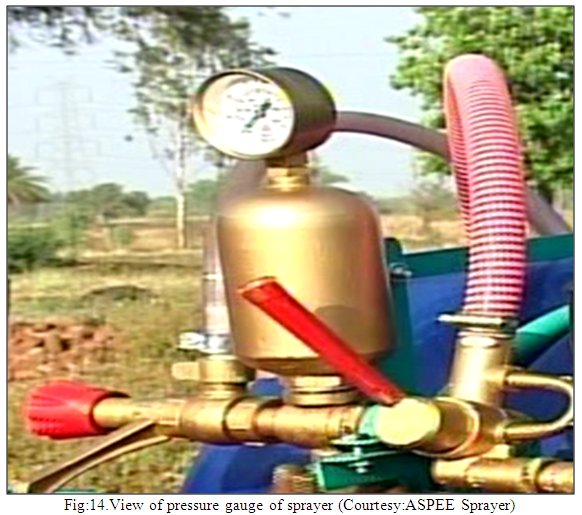
Step5. Pressure gauges
Pressure gauges are available as either oil-filled or dry. An oil-filled gauge is recommended because it dampens pressure pulsations and vibration resulting in a steadier reading.
To enable accurate reading of the pressure, use a gauge capable of reading twice the maximum pressure oneintends to use. Replacing old gauges improves spray quality considerably. If the pressure gauge accuracy is suspect, release the sprayer's in-line pressure, check for blockage from line to gauge and connect a new oil-filled gauge in parallel to compare readings (Fig: 14.). Check the pressure at each boom by temporarily installing an oil-filled pressure gauge in the last nozzle position of one boom.If necessary, remove the nozzle body and mount the gauge directly on the boom. Turn on the spray and compare the boom pressure to the desired pressure. If the boom pressure does not match the intended operating pressure, adjust the main regulator or bypass until it is as close as possible for each boom. The process varies with the sprayer model and the type of pump, so check manufacturer instructions.
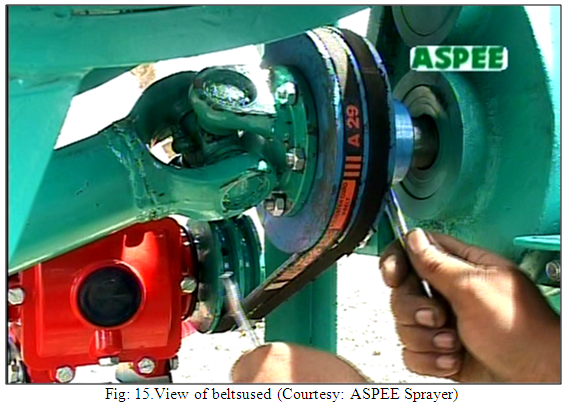
Step6. Belts and power take off
Check all belts for wear and proper tension. This ensures that power is transmitted efficiently. Tighten or replace any belts that require it (Fig: 15.). For PTO-driven units, grease the PTO splines and tubes and clean the connection zones. Check the universal joint(s) to ensure they are running smoothly and are properly lubricated - they often malfunction on the first spray of the season. Ensure that proper PTO and belt safety covers are in place and in good working condition.
Step7. Agitator:
Most spray materials do not mix well with water; one of the common causes of uneven application is poor agitation. For mechanical agitators, check for propeller wear and ensure that the paddles are secure on the agitator shaft. Lubricate the shaft bearing and adjust seals to prevent leakage. For hydraulic return agitators, ensure the pump capacity is sufficient to easily handle both the agitation system and the total nozzle output on the booms. Orient jets to swirl the tank contents, and sweep the bottom of any precipitate. Wet table powders require a special line from the pressure side of the pump (not the pressure regulator) to the tank for adequate agitation. Volume-booster nozzles, which create a vacuum to generate higher outputs without excessively taxing the pump, are recommended for hydraulic return.
Step 8: Propeller or centrifugal fan
Check the blades of sprayer propellers for any nicks or cracks that affect the balance of the propeller and produce vibration. Scrape blades clean to remove any accumulated residue. Vibration can also be an early sign of blade breakdown, so replace suspect or damaged blades. Tighten the bearings, lubricate the moving parts, check for loose bolts and broken brackets, and clean the trash guard. Ensure that the fan entrance grill is securely in place and has not been punctured or damaged.
Cannon-style airblast sprayers use centrifugal fans (also called squirrel cage fans or blowers). The fan wheel is composed of a number of fan blades mounted around a hub that turns on a driveshaft. As with the propeller, be mindful of vibration, lubricate the shaft and keep the interior of the fan clear of debris.
Step 9 Nozzles: Nozzles are often neglected. Because tip damage has a direct impact on product effectiveness and cost (Table 1), monitoring nozzle performance pays financial dividends.
To clean the delicate edges of the tip orifices, use a soft-bristled brush or a can of compressed air (used to clean computer keyboards). Operators often use a wire to clean plugged nozzles, but even a wooden toothpick can distort plastic or chip ceramic. Test nozzle performance during each calibration (at least before and mid-way through the season) or whenever damage is suspected. Even new nozzles can vary considerably in actual output (by as much as 15%), so never assume new nozzles are operating correctly.
Table: - 1The potential impact of damaged nozzles(Courtesy: ASPEE Sprayers)
Testing of sprayer nozzles:
- Temporarily install a pressure gauge on each boom behind the last nozzle.
- If the boom pressure is different from the required operating pressure, adjust the regulator to compensate and accurately set boom pressure.
- Use a length of hose to direct nozzle output into a graduated container and measure the discharge of clean water over a 1-minute interval.
- Compare the volume collected in the jar to the rate listed in the manufacturer's catalogue (in litres/min). Alternately, compare the nozzle output rate from the used tip to that of a known tip of the same size and shape.
- Repeat steps 3 and 4 for each nozzle.
If the nozzle output is 10% more or less than the ideal output, remove, clean and retest the nozzle. If the nozzle is still not giving desired output, replace the nozzle (both discs and spacers in the case of disc-core or disc-whirl nozzle assemblies). A maximum of 5% variation is acceptable but can be difficult to detect in field conditions. If two or more nozzles have an output 10% more than the desired, this indicates that all the nozzles are almost unserviceable and the entire set of nozzles should be replaced. Nozzle wear is a function of the chemical sprayed, the operating pressure and durationof use. Generally, a nozzle set should be replaced once a year or at the first signs of deterioration, whichever comes first. The cost of renewing an entire set of nozzles in a sprayer is a fraction of the cost of chemical waste and potential crop damage. Inevitably, all nozzles wear out, even ceramic ones.
Disc-core and disc-whirl nozzles are often installed incorrectly. Common errors include:
a) Disc and core (or whirl) materials are different
b) Core or whirl plate is installed backwards
c) Seal around or before core or whirl (when required) is deteriorated or missing
d) Cap is over-tightened and compression changes spray pattern or cracks ceramic disc. They should only ever be slightly beyond finger-tight.
Air-induction hollow-cone nozzles are also available for airblast applications, and there is considerable experimental evidence that they perform as well as conventional nozzles and reduce drift.
10. Cleaning the sprayer
Before cleaning a sprayer, read the equipment manufacturer's directions and consult the pesticide label for any special instructions. Ideally, clean sprayers at the end of each day (even if the same pesticide will be sprayed the next day) and before switching products. Many growers do not do this, but residues increase the chance of operator contamination, can damage sprayer components and may be incompatible with other products. There are two, situation-specific methods for cleaning an airblast sprayer. The first is when similar products will be used on two consecutive occasions. The second is when the product will be changed or when storing the sprayer for a prolonged period of time (e.g., winterizing). Common to both are the steps for triple-rinsing the sprayer.
a) Triple rinsing
Sprayers can retain several litres of spray solution following an application, even when the tank appears empty. Rinsing the spray tank multiple times with lower volumes has proven more effective at reducing pesticide residue concentration than a single, high-volume rinse. Low-volume rinsing may not be suitable for certain products; check the pesticide label for cleaning instructions.
- Add clean water to the tank to 10% capacity (ideally 10 parts water to 1 part spray solution remaining in the lines) and circulate it through the entire sprayer for 10 minutes. Open and close any control valves during this process.
- Carry clean water in a separate tank on the sprayer or on a support vehicle and rinse the exterior of the sprayer to remove pesticide deposits. Wearing appropriate personal protective equipment, scrub any persistent exterior deposits. When possible, perform this rinse in the field that was sprayed. The dilute rinsate can now be flushed through the lines and sprayed out through the nozzles onto the crop provided the operator does not exceed the label rate.
- Move the sprayer to a permanent loading/mixing pad and rinse the interior of the sprayer twice more (for a total of three) to ensure that the nozzle discharge is clear. Never allow rinsate to enter a waterway, drainage system or well. For more information, see the Ontario Pesticide Education Program's Grower Pesticide Safety Course manual.
Low-volume tank rinse systems that reduce operator exposure to pesticide residue are available on newer sprayers. They generally consist of a 200-L supply tank mounted above the pump to supply clean water to rinse nozzles inside the tank. The number and orientation of the rinse nozzles should provide enough water to contact all surfaces inside the tank; use rinse nozzles regularly to prevent seizing. Once again, run the system three times and open and close any control valves during this process.
Cleaning method 1: Using similar products consecutively
a) Proper planning ensures that all pesticides are used up at the end of an application. Never leave product in the tank overnight.
b) Perform a triple-rinse, as described previously.
c) Remove, inspect and clean the suction, in-line and filter screens. Replace when clean.
d) Remove, inspect and clean the nozzle strainers and nozzle tips. Replace when clean.
Cleaning method 2: changing products or storing the sprayer
a) Proper planning ensures that all pesticides are used up at the end of an application. Never leave product in the tank overnight.
b) Perform a triple-rinse, as described previously.
c) Remove, inspect and clean the suction, in-line and filter screens. Replace when clean.
d) Remove, inspect and clean the nozzle strainers and nozzle tips.
e) Refill the tank with clean water and any detergent recommended by the pesticide manufacturer. Many products list tank-cleaning information on the label, but if this is not available, use a specially formulated low-foaming detergent or alkaline cleaner and rinse thoroughly. Does not usebleach?
f) Start the agitator and circulate the solution through the system for at least 5 minutes.
g) Drain the sprayer through the plumbing system.
h) Repeat steps 5 through 7.
If changing pesticides, reinstall nozzle strainers and nozzle tips. If winterizing the sprayer, store the nozzle strainers and tips (or dispose of them in anticipation of a new set). With agitation on, circulate a 50% solution of water and automotive antifreeze with rust inhibitor throughout the lines for 5 minutes and drain it through the plumbing system (not the booms). If required, drain and flush crankcase and refill with new oil. Take this opportunity to touch up the paint. Leave the valves open and the tank lid loose. Protect plastic parts from sunlight. For short periods of idleness, non-corrosive liquids can be left in the pump, but air must be kept out. Plug the ports or seal port connections.
References:
Training module video (DVDs)and Literature providedby ASPEESprayer.
Jain S. C. and Philp Grace (2003) Farm Machinery an approach. Book Pub. Standard Publisher and distributor, New Delhi
Wadhwa D.S., Dhingra H. S. &Santokh, Singh Field operation and maintenance of tractor and farm machinery (FMP-301), laboratory manual by, Department of Farm Machinery and Power Engineering, PAU Ludhiana
Last modified: Wednesday, 19 February 2014, 9:32 AM