Site pages
Current course
Participants
General
Module 1
Module 2.
Module 3.
Module 4
LESSON 11. Disc plough – Adjustment, operation and maintenance
1. Introduction:
A Disc plow consists of a series of individually mounted, inclined disk blades on a frame supported by furrow wheel. A tractor –mounted disk plow has only a rear furrow wheel. Disk plows are most suitable for conditions under which mould board plows do not work satisfactory, such as in hard, dry soils, in sticky soils where a mould board plow will not scour, and in loose, push-type soils such as peat lands. A mould board plows, in soils and moisture conditions where it works properly, does a better job than a disk plow and has a lower specific draft.
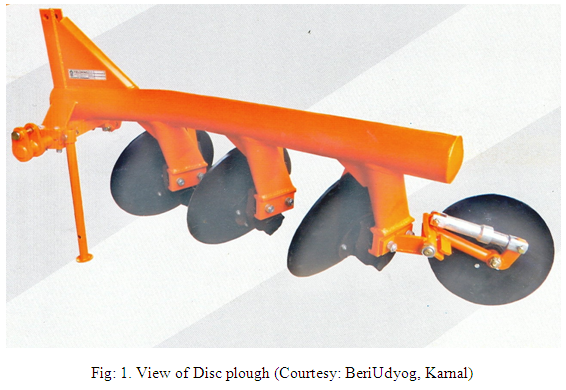
Disc Plough is equipped with heavy-duty tubular frame specially designedfor deep ploughing / land preparation of rough soil.
Regular and satisfactory operations together with economic and long lasting use of the plough depend on the compliance with instructions given in manufacturer’s handbook.
2.Adjustments
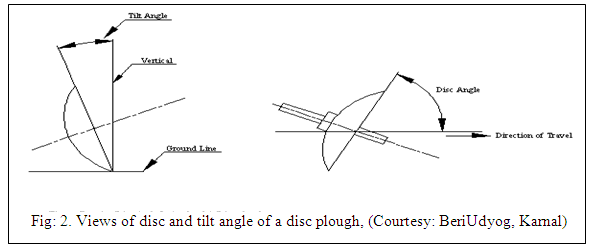
In order to get better results from disc plough under field conditions, the following adjustments are necessary (Fig: 2.):
a)Cutting Angle Adjustment: - Discs would not cut if they are rolled straight ahead. They must be set at anangle. Provision is made in the plough standard for the adjustment of the horizontal disc angle and vertical tilt angle to obtain optimum disc operation indifferent soil conditions.
- Disc Angle is the angle which the plain of cutting edge makes with the line of travel. It is normally 42 ̊- 45̊. Reducing this angle increases the disc rotation with respect to ground speed and reduces the tendency of the plough to over cut. Increasing the disc angle improves the disc penetration.
- Tilt Angle is the angle which the plain of the cutting edge makes with the vertical line. It ranges from 15 ̊ - 25 ̊. Increasing the tilt angle improves disc penetration in heavy, sticky soils. Decreasing the tilt angle improves disc penetration in loose and brittle soils.
b)Width of cut adjustment: -Every disc plough has a particular width of cut ranging from 18-25 cm depending on the diameter of the blade. However to suit various draft and penetration requirements the width of the cut for the front disc can be adjusted with the help of cross shaft. Cross shaft has an index line which can be lined up with different (1, 2, 3) markings on the cross shaft carrier.
c)Leveling the plough: - The level of the plough is controlled by the tractor top link. If the rear end of the plough beam is higher than the front end of the beam, lengthen the top link. If rear end of the plough beam is lower than the front end, then shorten the top link. Lateral leveling is controlled by adjusting the length of the tractor right lowerlink. These adjustments must be made with the plough prior to operation.
d)Tightening the bearing: - Bearings must be kept tight. Tighten the castle nuts until the disc binds the hub.
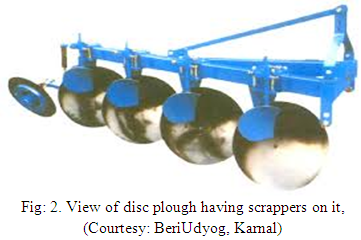
e)Scrapper adjustments: - Scrappers are set low enough to catch and turn the furrow slice before it falls away from the disc. For deeper ploughing, the scrapper has to be set a little higher. For sticky soils, set them closer to the disc. The research study datareveals that mould board type scrapper performs the best, but in sticky soils use of hoe type scrapper is better.
f) Draft of the disc plough
The type of the soil& moisture content are the greatest external factors to consider the draft of any plough. In very hard ground, it is often necessary to add weight to the wheels frame to force the plough into the soil.
The bearing conditions of the bearing housing will also affect the draft. Keep bearing in smooth conditions. i.e. apply the grease whenever necessary.
Draft is also affected by the depth and width of cut per bottom for complete plough. Speed is also another factor which increases the draft, doubling the speed increases the draft by about 20%-25%.
g) Adjustments for deeper ploughing
The depth of the plough can be obtained by the position and draft control levers of the tractor hydraulic system. However more depth can be obtained by:
- Adding extra weight to the plough.
- Reducing the tilt angle. A correctly tilted disc plough tends to penetrate better.
- If the ground is covered with trash, set the disc in almost vertical position and add weight to the plough. In such soils notched disc gives better results.
2. Warnings for the driver
- Before ploughing check all nuts and bolts of the disc plough.
- Don’t plough on stony soil.
- Tractor should be in high first gear.
- If the soil is hard then plough the field at least twice.
- Make sure that the shocker spring is tight.
- Lift the disc plough on every turn.
- Be vigilant about the tree roots and stones.
- Keep proper distance from disc plough when disc plough is in working.
- Lift the plough before approaching the road.
3. Safety Considerations
- In order to protect the operator, he should always wear adequate clothes and shoes during the operations.
- Never allow riders on the tractor or implement unless on additional seat is available.
- Be careful when moving around steep graders to avoid over turn.
- Never transport the implement on rough roads during the night.
- When operating, avoid making sharp turns that may contact with the implement.
- When disc plough is ready for use don’t stand between disc plough & the tractor.
- Properly fit the three point linkage as mentioned above & lock with lynchpin.
- In case of scrapper touching the discs, loosen the scrapper bolts and readjust the scrapper.
- Never turn the tractor to the right or left when the plough is engaged in the soil.
- Never reverse the tractor when the plough is engaged in the soil.
4. Maintenance of disc plough:
a) Maintenance instructions
If the disc plough is operated on stony land then maintenance also increases. Please follow these rules to get the best results:
- If disc plough is new then after first two hours of working tightening all nut bolts.
- Check the plough adjustments if the steering is hard.
- Check the scrapper adjustments frequently.
- If the soil has entered in grease nipple, then change the nipple.
- After every fifty hours grease all greasing points with grease gun and tighten all nuts and bolts.
- After three hundred hours of operation, open the hub of disc plough & cleanse it with diesel oil, pump in new grease & replace its seal.
- Constantly check for loose nuts and bolts.
- Sharpen the disc if the blades are dull. Blunt blades increase the draft considerably.
- When the diameter of disc is reduced to 24" (600 mm) it is desirable to change the degree of hub by loosening the mounting bolts.
- Discs cannot work beyond 22"(550 mm) diameter. They must be replaced for effective ploughing.
- Keep the bearings lubricated as per the instructions given in the manual.
- Coat the disc blades for rust prevention with the used oil in slack season.
b) Storage of machine after work
- Wash the disc plough after work.
- Replace the worn out nuts and bolts.
- If disc plough has to remain unused for long time then clean it & apply a layer of used oil for rust prevention.
- These steps will enhance the life of your Disc Plough.
c) Lubrication
Please take care that high quality grease is used in bearing housings, coulter hub & bushes.
References:
Jain S. C. and Philp Grace (2003) Farm Machinery an approach. Book Pub. Standard Publisher and distributor, New Delhi
Wadhwa D.S., Dhingra H. S. &Santokh, Singh Field operation and maintenance of tractor and farm machinery (FMP-301), laboratory manual by, Department of Farm Machinery and Power Engineering, PAU Ludhiana
Service and maintenance manual of Disc Plough, BeriUdyogKarnal (Haryana)
Last modified: Tuesday, 18 February 2014, 6:13 AM